The V1.09 firmware update fixes a lock-up bug related to using the Shortcut mode. The firmware version installed on your camera will be displayed on the lower right side of the LCD display when powering on the camera. More information about this firmware update and downloading instructions are available on the SeaLife website at http://www.sealife-cameras.com/firmware
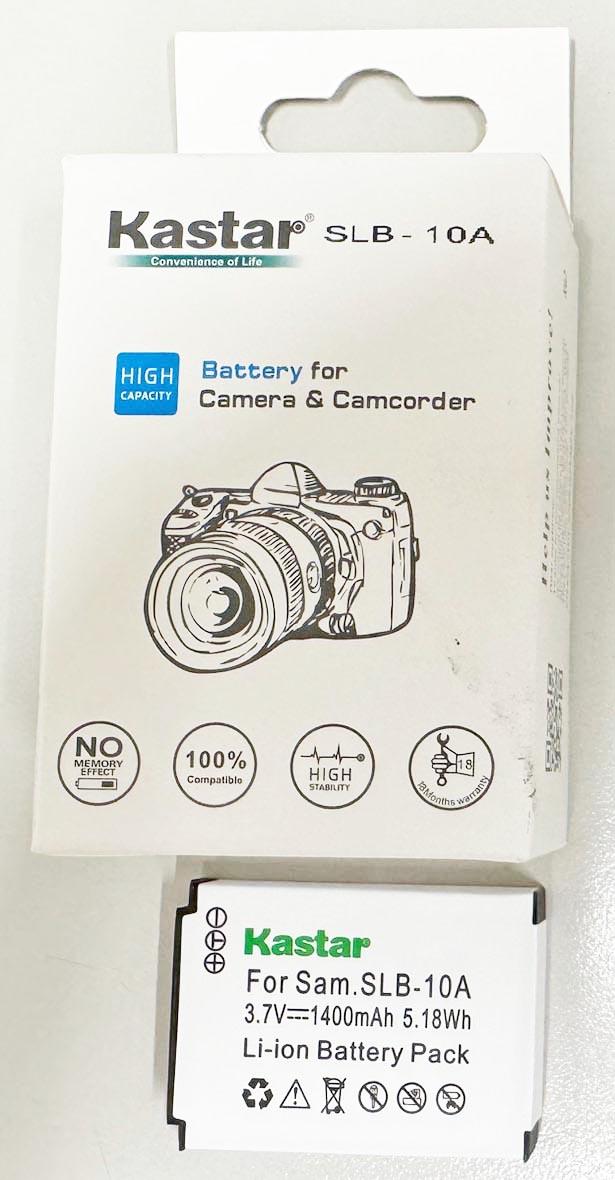
The original Fuji Electronics SL-B10 OEM battery for the DC2000 is discontinued. SeaLifePartsDirect.com sells compatible after-market batteries. Please note: We have tested many aftermarket batteries and found one that the “Kastar” brand SLB-10A battery works with the DC2000. The other SLB-10 batteries we tested fit inside the camera but are slightly undersized and do not make a reliable contact. Website links: sealifepartsdirect.com
There are various causes for the camera not powering on or charging. Please do the following in the order list below:
a) Test the battery voltage using a voltmeter. If it reads 0 volts (or near 0), the battery will not charge and needs to be replaced. Please see section # 2 for information on replacing the battery. Please dispose of the battery in accordance with your local recycling regulations.
b) Visually inspect the inside of the battery compartment to ensure it’s clean and dry. Contact our local authorized SeaLife dealer or service center in your country if there is evidence of corrosion or water damage to the contacts.
c) Thoroughly clean the contacts on the battery and inside the battery compartment with a clean cotton swab slightly moistened with isopropyl alcohol. Be careful cleaning the contacts inside the battery compartment – use a cotton swab moistened with alcohol and wipe along the face of the contact to clean.
d) Many aftermarket batteries advertised as “works with DC2000” are not compatible with the DC2000. Please see section # 2 for information on replacing the battery.
e) If the above does not resolve the issue, the battery contacts inside the battery compartment may have become misaligned with the battery. In this case, contact your local authorized SeaLife Service Center for repair.
If this information does not fix the issue, please contact your local authorized SeaLife dealer or the distributor/service center in your country for further advice or possible repair service.
Here are the known causes and solutions for camera locking-up.
A. Update your camera’s firmware to version V1.09. This fixes a lock-up bug associated with using the short-cut mode. Please visit the SeaLife website at http://sealifecamestg.wpenginepowered.com/firmware for instructions on downloading and installing the firmware update.
B. Use of a non-compatible memory card. We recommend using a micro SD, SDHC, SDXC or UHS-1 card with memory capacity up to 64GB. Using a 128GB or high memory card may result in a lock-up issue. We also recommend memory cards with 10MB/s read/write speed, which are marked with ![]() ,
, ![]() , or
, or ![]() . Using a card with faster read/write speed will not make the camera operate any faster and may result in compatibility issues.
. Using a card with faster read/write speed will not make the camera operate any faster and may result in compatibility issues.
C. The memory card has not been formatted and/or has erroneous files saved on the card. We recommend formatting memory cards before initial use. It’s also advised to format the card and perform system reset (“Reset All”) every couple of months in order to maintain optimal performance. Important: Formatting will erase all files saved on the memory card, please make sure to download your images/videos before formatting the card. The “Format” and “Reset All” functions are located in the camera’s system settings menu.
When recording video, the camera’s auto focus and auto exposure system may cause some audible clicking noise and visual “jumps” that you can detect when playing back the video.
The solution is to utilize the camera’s auto focus lock (AF-L) and auto exposure lock (AE-L) while recording video. This setting allows you to lock and unlock the camera’s auto exposure and/or auto focus by pushing the up [focus] button.
The AE-L and AF-L setting has many useful applications. For example, when recording video with continuous AF enabled, the camera frequently checks and adjusts focus throughout the recording, even if the shooting distance has not changed, which can be disruptive. Now you can lock the focus while recording and only unlock it when you are making significant changes to the shooting distance.
The same applies to auto exposure – the camera constantly monitors and adjusts exposure during video recording when moving from brighter areas to darker areas. These auto exposure adjustments are noticeable “jumps” caused by the lens iris changing, resulting in some disruption when playing back the video. Locking the auto exposure eliminates these steps and creates smooth video footage.
The AE-L and AF-L setting is a new feature included with firmware updated V1.08 (and also included with V1.09), which is a free download on the SeaLife website Tech Support page.
The AE-L and AF-L settings is located in the main menu and has also been added to shortcut setting for easy access and quick enabling/disabling when pushing the OK button. The AE-L, AF-L and AE-L & AF-L settings apply to still images as well as during video recording. The AE-L is not available in manual, shutter priority and aperture priority modes.
Note: When AE/AF Lock is enabled, the focus button is used to lock and unlock the exposure and/or focus, so you temporarily won’t have access to focus settings. For faster access to both Focus and AE/AF Lock settings, we recommend setting the Shortcut to AE/AF Lock. The Shortcut setting is located in the System menu. This way, you can easily disable the AE/AF Lock and regain access to the focus setting.
To set AE-L, AF-L and AE-L & AF-L:
- Go to the AE/AF Lock setting in the main menu and select among the 4 options – Off, AE-L, AF-L or AE-L & AF-L.
- Push the up [focus] key to lock the focus and/or exposure. A lock icon will appear on the left side of the display.
- Push the up [focus] key again to unlock the focus and/or exposure. The lock icon will disappear from the LCD display.
- For faster access, we recommend setting the Shortcut to AE/AF Lock. The Shortcut setting is located in the System menu.
The DC2000’s auto focus system requires sufficient lighting and contrast to focus on a subject. If the subject is in low light or blending in with foreground/background (i.e. low contrast), the camera will have a difficult time focusing on the intended subject. Another possible cause for out-of-focus pics is shooting in low visibility conditions. The camera may try to focus on the debris suspended in the water. Here are some tips for capturing sharp pictures:
- Make sure you have the correct focus setting:
Auto Focus: 6” to Infinity (15cm to infinity)
Macro Focus: 3.5” – 20” (9cm to 50cm)
Super Macro: 3.5”-20” (9cm to 50cm)
Infinity: 3ft – Infinity (90cm to infinity) - For still images, pushing the shutter button halfway will set the camera’s auto focus. Focus squares will appear on the LCD to indicate what subject the camera is focusing on. Green squares indicate the camera has found a subject to focus on. Red square indicates the camera could not find a subject to focus on.
- For videos, the video start/stop button does not have a halfway point. Pushing the video button will set the camera’s focus and begin recording. The Auto focus setting only applies to pictures and not to video. You may turn on the Continuous AF Video setting, so the camera will check and adjust focus while recording videos very few seconds. This setting is better used for close-up videos where you know that the shooting distance throughout the video clip will change. Shooting video beyond 3ft (90cm) with Continuous AF enabled may be disruptive as the camera constantly refocuses when it doesn’t need to.
- When taking pictures beyond 3ft (90cm) shooting distance, set the camera to Infinity focus setting. This locks the auto focus to infinity and objects beyond 3ft (90cm) will be in focus. This setting is also ideal when shooting larger moving subjects, like sharks and mantas.
- Use one or two photo-video lights to illuminate the subject
- The default AF Area setting is “Wide”, which applies to most shooting scenarios. You may set AF Area to “Center” when the subject you want to focus on is positioned in the center of the image frame.
Important notes about auto focus
- When shooting video, the camera’s focus range is 3.5” (9cm) to infinity when set to regular AF, Macro, Super Macro or Infinity focus. Firmware update V1.08 (and V1.09) allows the camera to use Infinity focus when shooting video, so all objects beyond 1m will be in focus depending on ambient light conditions and aperture setting. See below for more details about minimum shooting distance when using Infinity focus setting.
- When the camera is set to Infinity focus setting, the Continuous AF Photo and Continuous AF Video settings will be turned OFF and cannot be enabled.
- When shooting video in regular AF or Macro focus, the camera will adjust and lock focus after pushing the video start button. When Continuous AF Video is turned on, the camera will check and adjust focus every few seconds. We recommend keeping Continuous AF Video turned OFF as the frequent focus adjustments disrupt the video and may cause audio interference.
- The camera’s aperture setting will affect the minimum shooting distance when using infinity focus setting. A small aperture of f/11 has longer depth-of-field and closer minimum shooting distance compared to f/1.8. The minimum shooting distance is 3ft (1m) when camera is using to f/4.5 or smaller aperture. The minimum shooting distance for f/2.8 and f/1.8 is 6ft (2m) and 12ft (4m), respectively. In order to control the aperture and depth of field, we recommend shooting pictures in Aperture Priority or Manual mode. Since video recording uses auto exposure, more ambient lighting or bright photo-video light is needed so the camera will use smaller aperture value.
Here are some common causes and solutions if the Sea Dragon flash is not firing or synchronized with the DC2000:
- The DC2000 will sync with the Sea Dragon Flash in any mode – UW Ext Flash, Program, Manual, Shutter Priority and Aperture Priority. The Sea Dragon Flash is factory programmed to fire with cameras that don’t use a pre-flash. The DC2000’s UW Ext Flash and Manual modes do not use pre-flash, but Program, Shutter Priority and Aperture Priority modes do use a pre-flash. You will need to re-sync the flash if switching between pre-flash and non-pre-flash modes. To resync the strobe, power off the flash >>> push and hold the test button and power on the flash [status light will blink] >>> take a test picture [status light is solid] >>> flash is now sync’d. You may also update the firmware to version V1.09, which has a pre-flash on/off setting. Turn pre-flash setting ON and all the modes will use pre-flash.
- Check optical cable connection. Make sure both ends of the cable have a clean cut – If not, cut with a razor blade. Inspect for bends, “kinks” in the cable – replace cable if there is a hard bend. Make sure there are no obstructions inside the cable hold under the flash that prevents the light from reaching the light sensor – clean as needed.
If this information does not fix the issue, please contact your local authorized SeaLife dealer or the distributor/service center in your country for further advice or possible repair service.
Some DC2000 owners have informed us that their camera sometimes powers on by itself and waiting to establish a wireless connection. The camera displays “Waiting for Mobile Phone to Connect”, which may drain the battery unless the camera is powered off or battery is removed.
After further investigation, we discovered that the source is related to 3rd party apps installed on a nearby smartphone or tablet. Some apps, like Garmin Connect or Fitbit, use Bluetooth to automatically connect to their respective devices. These apps may constantly hunt for a Bluetooth connection, resulting in unintentionally powering on other Bluetooth devices, like the DC2000. We found other camera brands that feature wireless connectivity experiencing the same issue (See https://community.gopro.com/t5/Cameras/GoPro-Hero-5-Black-Turning-On-By-Itself/td-p/16106/page/7).
To address this potential issue, we have added a “Bluetooth On/Off” setting to firmware update V1.08 (and also included with V1.09). The Bluetooth factory default setting is “On”. If you experience the DC2000 camera powering on by itself, please turn the Bluetooth setting to “Off”. The camera will operate normally when Bluetooth setting is off, however the battery power will drain faster. It is recommended to keep the Bluetooth setting ON unless you find yourself in a specific location where some surrounding device is power on the camera.
RAW+JPEG setting will be blocked-out (gray) under the following conditions:
- Exposure Bracketing is enabled
- Photo Size is NOT set to 20M
- Image Ratio is NOT set to 3:2
- Camera set to Intelligent Auto, Land SCN or Panorama modes. RAW+JPEG is only possible in Program, UW SCN modes, Manual, Aperture Priority or Shutter Priority.
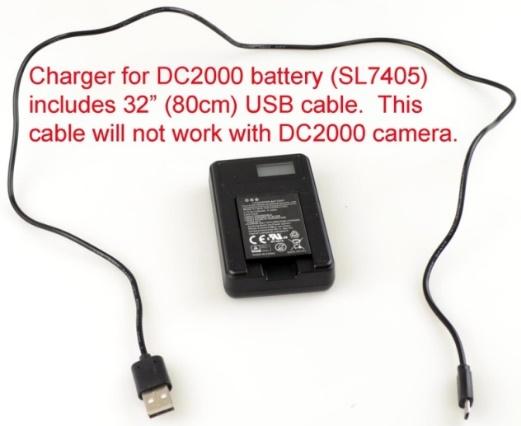
 Other types of USB cables may fit into the camera but may not make a data connection. For example, the USB cable included with the DC2000 battery charger (SL7405) will also fit the camera but will not make a data connection.
- Visually inspect the inside button reaches (shown below) for cracks. If the reach is cracked, it needs to be replaced by an authorized SeaLife Service Center in your country. SeaLife offers a free DC2000 Button Reach Kit (item # SL74112) that includes one of each reach used in the DC2000 UW housing.
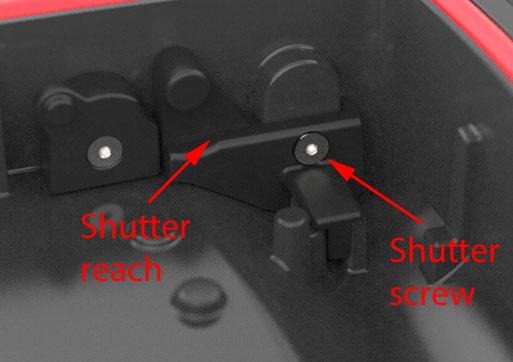
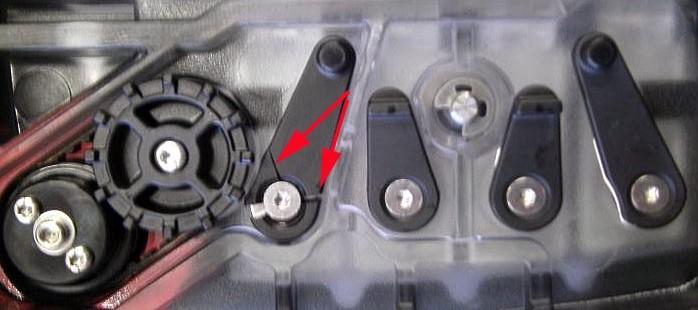
- Using a Torx T5 screwdriver, check if any of the reach screws has become loose. Fingertip tighten any loose screws using the Torx T5 screwdriver. Do not overtighten.
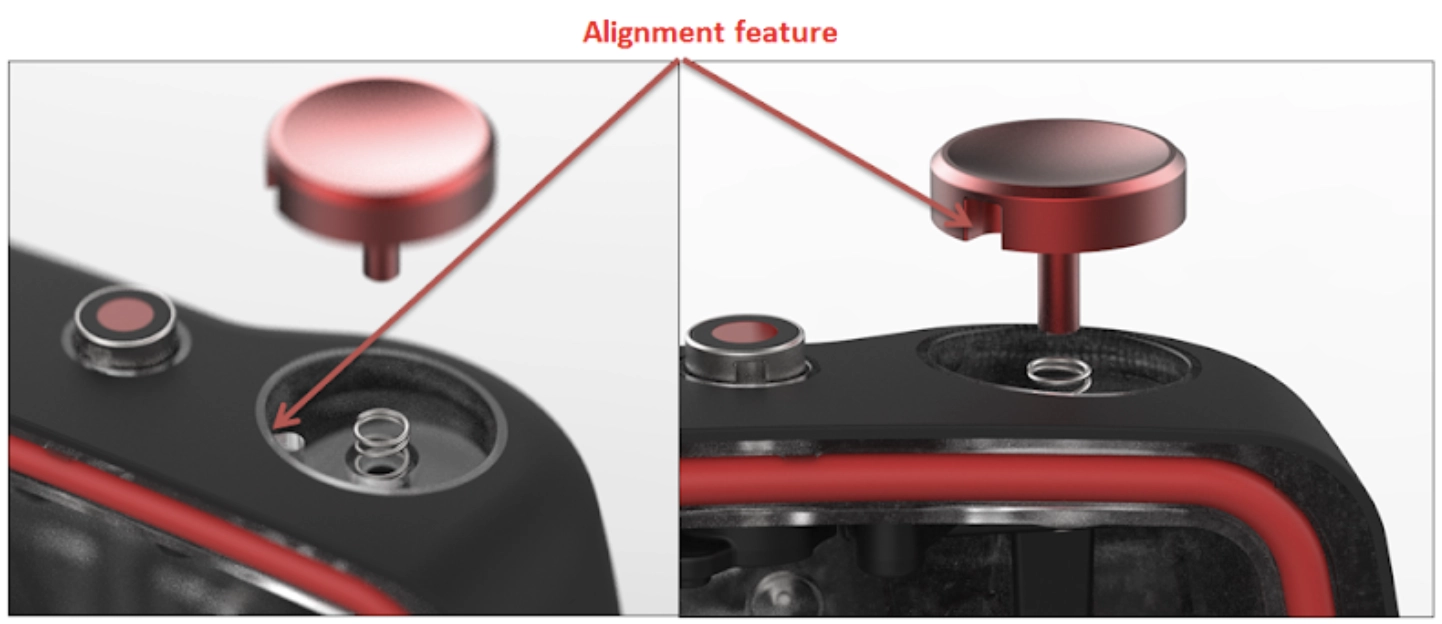
- If you replace the shutter button reach, avoid disassembling the shutter button assembly by keeping the shutter button pushed down when the reach or reach screw is removed. If the external shutter button comes out (as shown below), make sure the alignment feature is aligned before tightening the screw.
- If any of the buttons stick or up/down action is not smooth, there may be sand trapped under the buttons. Soak sealed housing in fresh water for 20 minutes to dissolve any salt trapped under the buttons. Hold the housing underwater and push each button 25 times to flush out any sand. If the buttons are still sticky, contact the authorized SeaLife Service Center in your country for thorough cleaning and lubing.
The cabin and cargo pressure in airplanes can create a vacuum seal inside the housing, making it hard to open the housing door after landing. Do not use tools to pry open the housing! Open the latch and firmly grab and lift the door to open the housing. To prevent this vacuum lock effect, leaving the housing door open during air travel. Make sure to pack the housing in such a way as to protect the o-ring from damage and dirt.
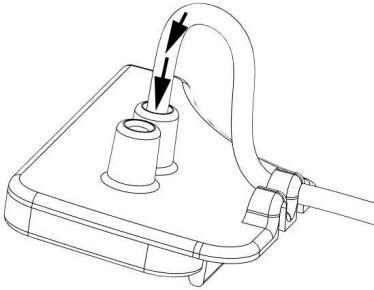
The housing wrist strap included with the DC2000 UW camera attaches to the housing as shown below. Note: The clip is used for attaching the camera to your BCD (buoyancy Control Device) D-ring.
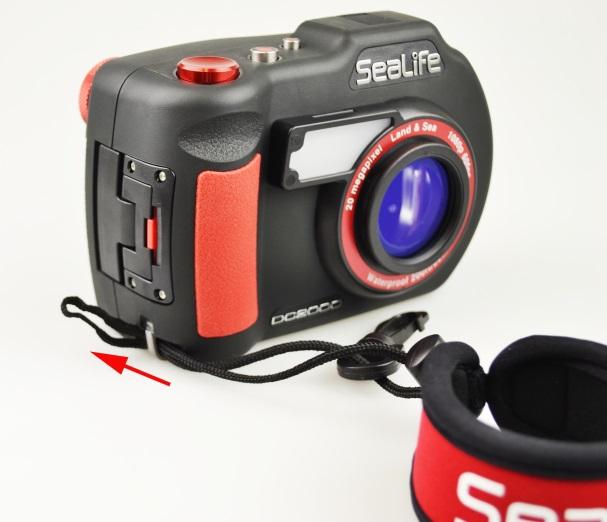
Insert looped end of nylon cord through the housing strap connector.
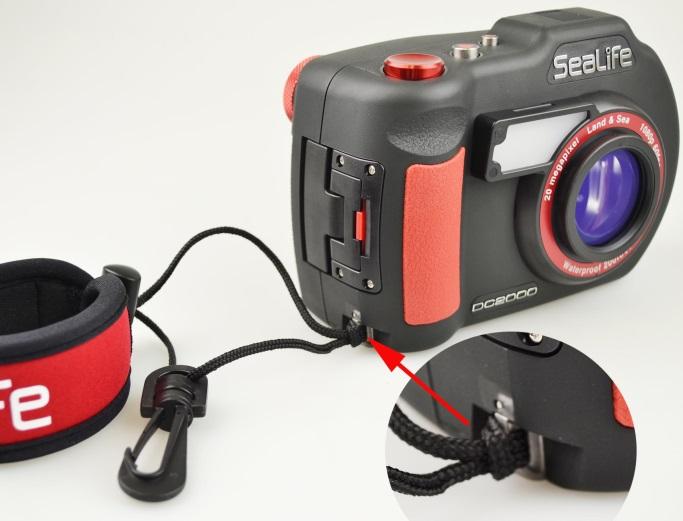
Feed strap through looped end and pull tight.
Follow these steps to ensure smooth operation of the mode dial at depths greater than 100ft (30m):
- Synchronize the mode dial of inner camera with the UW housing mode dial before sealing the housing.
- After sealing the camera inside the housing, rotate the mode dial in any direction and then return it to the desired mode setting. This will automatically seat the mode dial gears. If the gear teeth are not seated on land or at shallower depths, it may be difficult to rotate the dial at depth.
Humid air or water drops trapped inside the underwater housing and inner camera may condense on the cooler glass lens port and cause fogging. Here is the best way to prevent fogging:
- Do not allow any water drops to enter the inside of the housing or camera’s battery compartment. Even one water drop can evaporate and condense (fog) on the lens port.
- Inner camera must be completely dry before inserting it into the UW housing. To minimize chance of fogging, do not expose inner camera to moisture before use in dive housing. Using the inner camera underwater or in wet environment without the housing will trap water drops in the small crevices, so it is important to allow camera to thoroughly dry before using it inside the housing. Inner camera may appear to be completely dry, but still have residual water trapped in the small crevices.
- Load the camera and housing in a dry environment, like an air-conditioned room. This will help to avoid trapping humid air inside.
- Avoid letting the camera get hot or sit in direct sunlight.
- Avoid opening the housing in a humid environment. If you do change the battery between 2-tank dives, make sure you and the camera are dry before opening the housing.
- Use a fresh Moisture Muncher desiccant capsule (item # SL911) inside the housing.
- If using the waterproof inner camera in wet environments (without the UW housing), allow the camera to completely dry before inserting it into the UW housing. Water trapped in the camera’s speaker and microphone holes may evaporate inside the housing and cause fogging to occur.
- If the housing or camera lens fogs, do this:
- Load one fresh Moisture Muncher capsule inside the camera’s battery compartment and seal the camera for 1 to 2 days. This will dry out the inside of the camera.
- Load one Moisture Muncher capsule inside the UW housing and seal the camera inside the housing for 1 to 2 days. This will dry out the inside of the housing and exterior of the camera.
If you followed the above advice and the camera or housing still fogs, contact your local authorized SeaLife dealer or the distributor/service center in your country for repair service.
If you are unable to locate the Link123 Plus Android app in the Google Play store, you can manually download and install the app by clicking the following Dropbox link –
https://www.dropbox.com/scl/fi/pr4idom85n3x2mv8dgbbe/Link123Plus_AndroidApp_V1.15.apk?rlkey=uoiced6j6uy7wxx70j25w963j&dl=0
Download the Link123 Plus app version V1.15 using your Android phone. Save the APK file to your device and open it using your “My Files” app.
Please contact service@sealife-cameras.com if you experience any issues with the app. Make sure to include the make/model of your phone and what operating system it is running.
This update fixes a file sharing bug with iPads running iOS14 and 15. Please visit the Apple App Store on your iPhone and/or iPad to update the app.
Please email quality@sealife-cameras.com if you find any bugs or issues with the app.
Google’s release of Android 11 operating system causes the Link123 Plus app to crash when opening the app. This issue has been fixed with Link123 Plus app update version V1.15. Please go to Google Play store on your Android phone and install the update.
Please email quality@sealife-cameras.com if you find any bugs or issues with the app. Thank you.
Here are steps for establishing a wireless connection between the camera and Link123 Plus app:
- Power on the camera.
- Launch the “Link123 Plus” app on your phone or tablet.
- Select “Enable Camera’s WiFi” to display a list of cameras within wireless range.
- Select your camera from the list. It will start with “abcam” followed by 7 digits corresponding to the camera’s serial #.
- The camera will display a message, “Waiting for the mobile phone connection.”
- Go to your phone’s WiFi Setting and select your camera from the list of available hot spots.
- Enter the default password “12345678”.
- Close the WiFi settings menu and open the Link 123 Plus app again.
- Select OK (Enter App) on your smart device.
If a wireless connection was successfully established, you will see a live view from the camera displayed on your phone or tablet. If the connection was not successful, please follow these troubleshooting tips:
- The camera must have date/time setup completed before attempting to connect to Link123 Plus app.
- Turn off the phone’s Cellular connection or turn ON the Airplane mode and then turn on WiFi. Cellular and Airplane mode settings are located at the top of the main settings menu. This is necessary because some phones will drop the WiFi connection in favor of a cellular connection with internet. Note: Your phone may show “No Internet connection” under the Micro 3+ WiFi connection, which is normal – the camera does not provide an internet connection.
- Reboot your camera and phone, and try again.
- Make sure all Link123 Plus app permissions are allowed. Go to phone settings scroll down to the Link123 Plus app, and allow all permissions.
- If you have installed a VPN [virtual private network] app on your smart phone or tablet, disable the VPN before attempting to establish wireless connection with the DC2000 camera. The VPN app may interfere with the ability to wirelessly connect to the cameras.
- Here are two videos showing how to make a WiFi connection for iPhones/iPads and Android phones/tablets:
After downloading videos from your DC2000 camera to Link123 Plus app, you can playback videos within the Link123 Plus app. The downloaded videos will not appear in the Android device Gallery app; however, the files are saved to the “My Files” app included with your smartphone/tablet. Here’s where the downloaded video files are saved. This only applies to Android devices and not iPhones/iPads.
- Open your “My Files” app. My Files app is located in your device App folder.
- Select “Internal Storage”
- Select “DCIM”
- Select “Link123 Plus”. Downloaded videos will be saved here.
You can add a shortcut to your home screen so video files are only one click away. There are many free “file browser apps” available in the Google Playstore. For example, the “ES File Explorer” app is one that we have tested and works well.
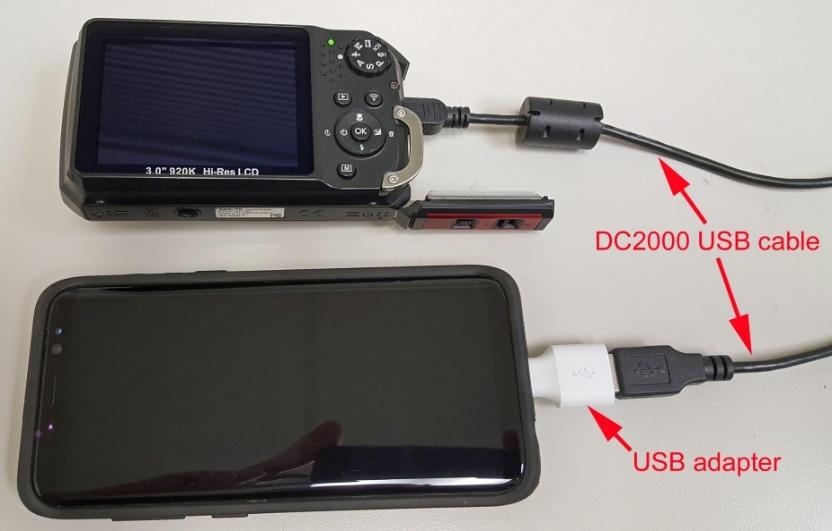 Connect the USB to your phone/tablet. Connect the DC2000 USB cable to the camera and USB adapter. Power on the camera. Open “My Files” app located in your device system tools. There you will find all the photos/videos saved in your camera.
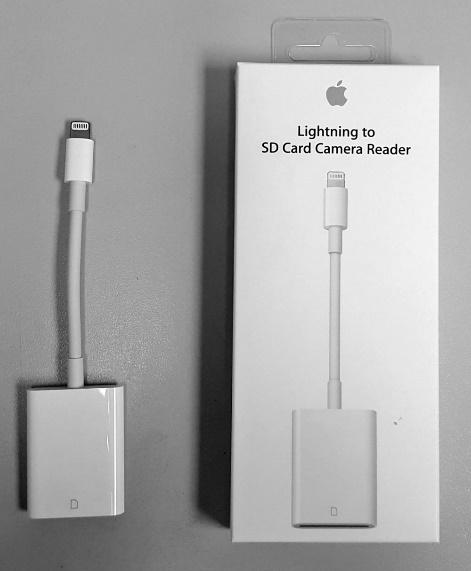
For iPhone/iPad devices – Apple manufacturers a Lightning to SD Card Camera Reader accessory that allows you to import photos/videos from a SD or micro SD memory card directly to your iPhone or iPad. This is a faster alternative to using the DC2000’s wireless connection for importing files.
Connect the USB to your phone/tablet. Connect the DC2000 USB cable to the camera and USB adapter. Power on the camera. Open “My Files” app located in your device system tools. There you will find all the photos/videos saved in your camera.
For iPhone/iPad devices – Apple manufacturers a Lightning to SD Card Camera Reader accessory that allows you to import photos/videos from a SD or micro SD memory card directly to your iPhone or iPad. This is a faster alternative to using the DC2000’s wireless connection for importing files.

- Remove the micro SD memory card from your DC2000 and insert it into the SD card adapter. That converts the micro SD card to a standard sized SD card that fits into the card reader slot. Your micro SD card should have included the SD card adapter.

SD Card Adapter (left) and micro SD card (right) - Insert the SD card into the Lightning card reader and connect the card reader to your iPhone or iPad.
- Open the Photo app and select the “import” tab on the bottom right of the app. Select the files you want to import. The selected photo and video files will be saved to your iPhone/iPad’s photo gallery. NOTE: With iOS 13, Apple removed the “Import” tab from the Photos App. After step b above, open the Files app on your iPhone/iPad and select the “Untitled” location.
The Link123 Plus app is compatible with Android smart phones and tablets running Android version 5.0 or higher. If your phone/tablet is running on an older Android Version, the Link123 Plus app will not appear in the Google Play Store. Please try updating the Android version on your device or consider using a newer Android device running Android 5.0 or higher.


SeaLife has updated the DC2000 instruction manual in January 2019. The updated version is marked “4th Edition – January 2019” on the back cover. The updated manual includes some corrections from previous manual editions and new information related to firmware update V1.09.
Please email quality@sealife-cameras.com if you find any typos or discrepancies in the instruction manual.
The SL975 fisheye lens accessory works with the DC2000 camera when used underwater. On land, the camera will not focus with the fisheye lens attached. The camera may be set to any focus setting (i.e. Auto Focus, Macro or Super Macro), except for infinity.
The DC2000 UW housing and inner camera uses marine-grade stainless steel or anodized aluminum hardware suitable for saltwater and marine environments. If not properly cared for, rust stains and corrosion may appear on the stainless steel surfaces. Make sure to soak the sealed housing in fresh water for 20 minutes to fully dissolve any trapped salt residue. Push each of the buttons multiple times while the housing is soaking to remove any sand and debris trapped underneath the buttons. Allow the housing to completely dry before storage. Keep all metal surfaces clean. If rust stains appear, use a soft bristle brush (like toothbrush) or clean moist cloth. A good source for more information on stainless steel is http://www.ssina.com.
If the rust stain does not clean off, or if you see that rust stains have entered inside the shaft of the metal buttons [which usually will result in the button sticking], contact your local authorized SeaLife dealer or the distributor/service center in your country for repair service.
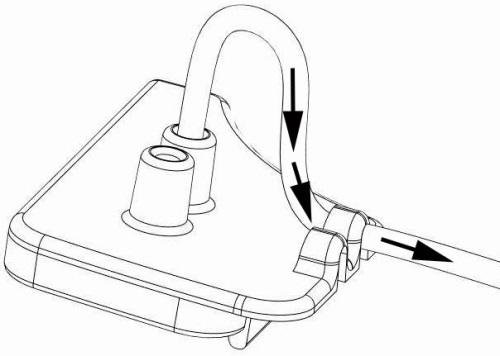
Follow these steps to ensure the optical cable is securely connected to the Flash Link adapter:
- Insert the non-coiled end of the optical cable (A) through one of the grabber holes of the Flash Link adapter (B).
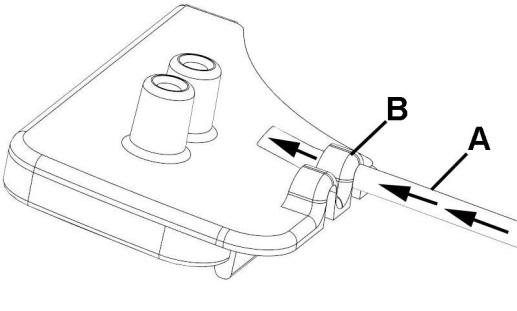
- Pull about 2” (5cm) of the optical cable through the grabber hole and insert the end of the cable into the other hole as shown below. Push cable end down into the hole until it comes to a stop.
- Pull the other end of the camera to remove some of the extra slack, leaving about 1” (2.5cm) of cable bend as shown below. It is normal for thin layer of cable sheathing to be scratched off during this procedure.