To set the flash to AUTO mode, turn the brightness control counter-clockwise until it stops. It’s okay to rotate the knob beyond the “A” symbol. DO NOT force the brightness control knob beyond its stop point or you may damage the switch. Avoid positioning the knob between the #10 and “Auto” or the flash may not fire.
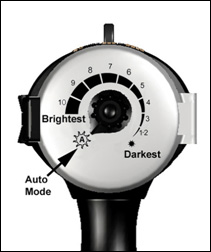
The above picture shows the brightness control knob in the correct position – all the way counter-clockwise.
Back to Index
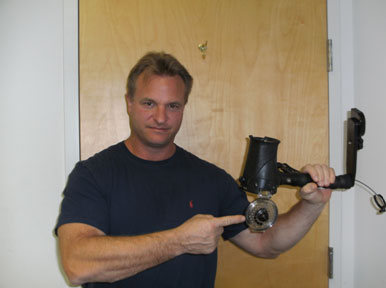
Some power switches are too loose, causing the switch to move out of the desired position during the dive or when inside the travel case. This can be fixed by loosening the 2 “bridge” screws by ½ turn. If this does not fix the problem, please contact your local authorized SeaLife dealer or the distributor/service center in your country for repair service.

The above picture shows the symptoms of a loose power switch – switch rattles when shaken and easily moves between positions with minimal “clicking” noise.
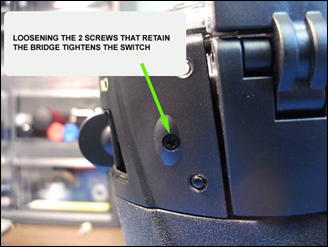
One of the two screws that secure the switch assembly is shown above. The other screw is located on the other side of the switch assembly. Loosen both screws by ½ turn only.
Back to Index
When sealing the Digital Pro Flash, carefully inspect that the black/gray cable does not get trapped under the waterproof door. This will prevent the waterproof door from closing all the way which prevents the o-ring from making a proper waterproof seal.
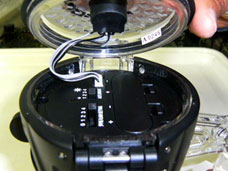
The above picture shows the cable in a bad position – It will most likely get trapped under the waterproof door.
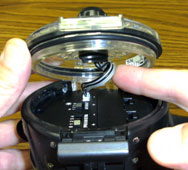
When closing the waterproof door, gently direct the cable so it does not get trapped or interfere with the sealing area.
If you have any questions or need assistance, please contact your local authorized SeaLife dealer or contact SeaLife Customer Service Center for repair service.
Removing the O-ring and Gasket
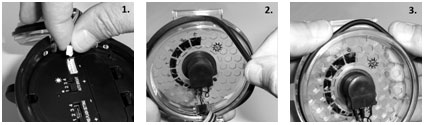
- Grab white cable adapter and pull up to unplug the cable from the flash. Do NOT pull on the wire.
- Remove gasket with your fingers.
- Remove O-ring with your fingers
Important: Do NOT use tools or sharp objects or you may damage the O-ring or Gasket.
Inspecting and Cleaning the O-ring, Gasket and contact surfaces
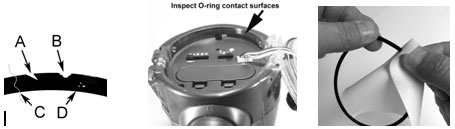
- Carefully inspect the O-ring and Gasket for cuts(A), tears(B). Replace O-ring and Gasket if damaged.
- Carefully inspect O-ring contact surfaces and groove for scratches or other damage. It is normal to see molding “seams” near the hinge and latch area. Contact the SeaLife service center in your country if the contact surfaces or groove are damaged.
- Use a moist, clean cotton cloth to remove hair (C), sand (D), and other debris from O-ring, Gasket, O-ring groove and contact surfaces. Never stretch the O-ring or Gasket
Installing the O-ring and Gasket
- Install clean O-ring into groove. Be careful not to twist O-ring.
- Install clean Gasket, making sure it is completely seated against the waterproof door. The grooved side of the Gasket should sit flat against the waterproof door.
- Plug the cable adapter into the flash. Do NOT use force. Check that the white cable adapter is correctly oriented with the plug.
- Do not lubricate the O-ring or Gasket.
- Do not exceed operating depth of 200ft/60m.
- Do not open waterproof door in wet environment. You and the flash must be dry before opening the waterproof door.
- Do not expose flash to direct sunlight for prolonged periods of time.
- SeaLife recommends replacing the O-ring and Gasket every year.
- The O-ring and Gasket set (SL96114) is available at your local authorized SeaLife dealer or online at www.sealifepartsdirect.com
The flash brightness of the SeaLife Digital Pro (SL961) can be adjusted manually or set to AUTO. Here are a few tips to avoid over-exposed pictures when the brightness control is set to AUTO
1) Make sure AUTO mode switch is set to the #1 position for SeaLife cameras. If the AUTO mode switch is set to 2, 3 or 4 position, you may get over-exposed (washed out) pictures when the brightness control knob is set to AUTO.
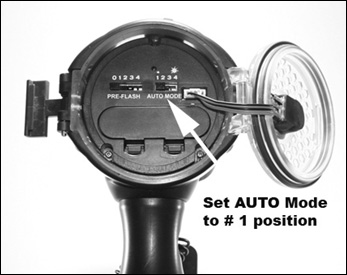
AUTO Mode switch set to #1 position
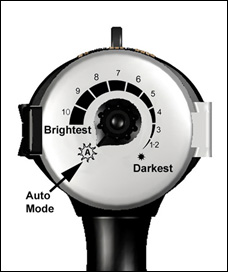
Brightness Control Knob set to AUTO.
2) The SeaLife camera should be set to Ext Flash mode (See camera instruction manual for more details about Ext Flash Mode). When the camera is set to Ext Flash mode, you can push the Flash Button to switch between Macro Flash, Normal Flash and Far Flash. Setting it to “Macro Flash” will darken the image exposure.
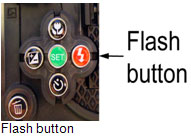
Flash button on back of camera housing
![]()
The above icon will appear on LCD screen when camera is set Macro Flash icon
3) Use the Digital Pro Flash Diffuser (Item # SL9618 – sold separately) to reduces “hot-spots” and prevent over exposed (washed-out) pictures. This accessory is especially helpful for macro (close-up) pictures. The diffuser easily clips on to the flash and can be flipped up and down.
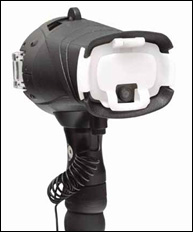
Digital Pro Flash with Diffuser in the down position, ideal for macro (close-up) pictures.
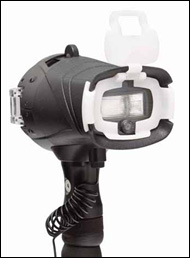
Diffuser shown in the up position, ideal for longer distance pictures.
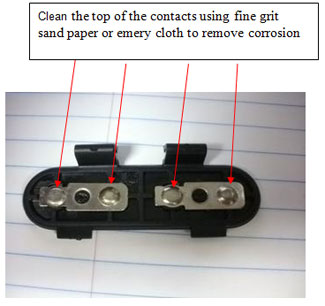
If the flash does not power on (i.e. red ready light does not come on), do this:
- Make sure batteries are new or fully charged. Try using a different set of new or freshly charged batteries.
- Clean the battery lid contacts with a fine abrasive emery cloth. Even a thin, near-invisible amount of corrosion can prevent the batteries from making contact.
When you remove the Pro flash from the water or rinse tank, towel-dry the flash and open the waterproof door with the door facing down towards the ground. This will ensure that the residual water that accumulates outside of the O-ring does not enter the flash module.