
How to Shoot Great Macro Images
Brent Durand

Brent Durand offers his expertise in taking underwater photographs with the compact, easy-to-use SeaLife DC2000 camera.
Great macro images stand out from ordinary snapshots. They show deliberate thought, planning and application of great photo composition. This can seem intimidating at first, but with the right camera settings and a few guidelines, underwater macro photography will become second nature.
This article focuses on using the SeaLife DC2000 camera. It’s compact, easy to use, and when paired with the DC-Series Super Macro Lens, allows you to capture great macro and super macro images.
When to Use the Super Macro Lens
Generally, we want to use the Super Macro Lens when the subject is smaller than 3 inches (7.6cm) across and we want to position the camera as close to the subject as possible. Here’s why.
All camera lenses have a minimum distance at which they can focus (3.5” for the DC2000 in Macro Focus Mode). When we half depress the shutter button, the focus area box turns green to indicate that the subject is in focus.
When the subject appears too small in the frame, we move the camera closer to make the subject appear larger, half depressing the shutter again. We do this until we notice that the camera cannot achieve focus, displaying a red focus area box. This means the camera is inside the minimum focus distance. If the subject still looks too small in the frame, it’s time to attach the Super Macro Lens. This allows you to move the camera closer to the subject to capture more detail. For the DC2000, the Super Macro Lens allows you to get as close as 1.5” (4cm), effectively enlarging the subject by 2.3X. Using the lens in combination with the DC2000 Super Macro focus mode results in enlarging the subject by 4X.
Attaching the diopter will not only magnify the scene, but allow you to move the camera slightly closer to the subject to capture more detail.
Pro Tip: Be sure to keep your photo-video light on when composing your photos, as it will greatly help the camera achieve focus.
Setting Up The Camera for Macro Photography
One great thing about the DC2000 is that it allows you to shoot in auto or manual mode, using the camera’s internal flash or any combination of external flashes and photo-video lights. If you are a beginner photographer, we recommend using one of the underwater scene modes, which will automatically adjust the camera’s exposure. More skilled photographers may prefer to us the manual mode, giving them full control over the cameras exposure settings. Here are the suggested camera settings depending on what shooting mode you select and what type of lighting you’re using.
All camera lenses have a minimum distance at which they can focus (3.5” for the DC2000 in Macro Focus Mode).
Automatic Macro Shooters
Rotate the mode dial to the Underwater Scene mode (fish icon). Next, press the Menu button and then the down arrow followed by OK to select the appropriate Underwater Scene Mode according to your camera and lighting setup.
- If you are NOT using an external flash or photo-video light, select Dive or Snorkel mode according to your depth. Change only the following menu settings:
Focus Mode: Macro
Flash: Force On
ISO: 125
AF Area: Center
Note: When the camera’s flash is set to Force On, the camera will override the white balance setting and lock it to 5500K to match the color temperature of the flash. When you turn the camera’s Flash Off, it will use whatever white balance setting you select.
- If you are using one or two external flashes or combination of external flash and photo-video light, select Ext Flash. Change only the following menu settings:
Focus Mode: Macro
ISO: 125
AF Area: Center - If you are using one or two photo-video lights (no flash), select Ext Light. Change only the following menu settings:
Focus Mode: Macro
ISO: 125
AF Area: Center
- If you are NOT using an external flash or photo-video light, select Dive or Snorkel mode according to your depth. Change only the following menu settings:

When the subject appears too small in the frame, we move the camera closer to make the subject appear larger, half depressing the shutter again.
Manual Macro Shooters
Rotate the mode dial to M for manual. Use all the factory default settings and change the following menu settings according to your camera setup:
- If you are NOT using an external flash or photo-video light:
Focus Mode: Macro
Flash: Force On
ISO: 125
AF Area: Center - If you are using one or two external flashes or combination flash and photo-video light:
Focus Mode: Macro
Flash: Force On
ISO: 125
AF Area: Center - If you are using one or two photo-video lights (no flash):
Focus Mode: Macro
Flash: Force Off (you may also try Force On as a fill light)
ISO: 125
AF Area: Center
Manual exposure will be determined by the intensity and type of lighting being used, but a great macro starting point for the DC2000 is ISO 125, f/8 and 1/200s. This combination provides nice depth of field for macro shooting, plus the ability to create dark backgrounds if open water is behind the subject. It’s important to note that this is just a starting point, and that minor adjustments will almost always be necessary.

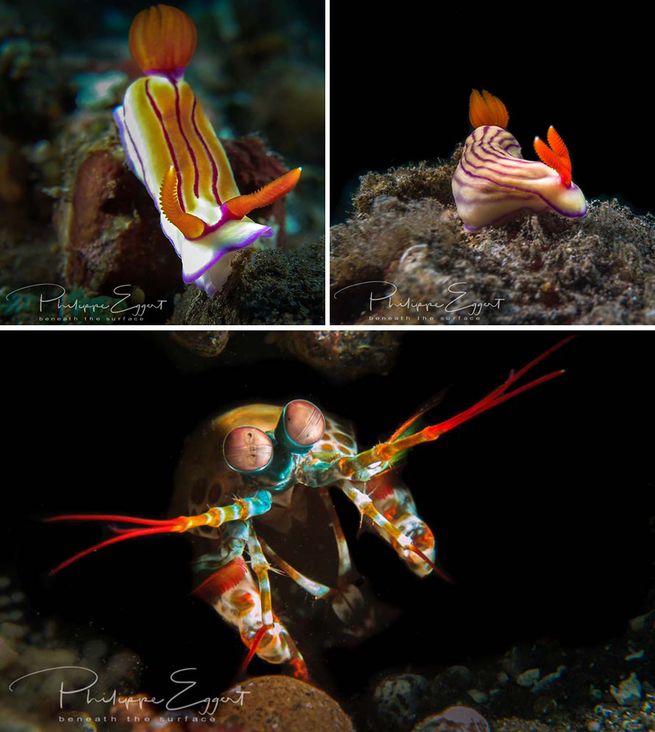
Focus the photo on the subject’s eye (or rhinophores if a nudibranch).
Macro Photo Tips
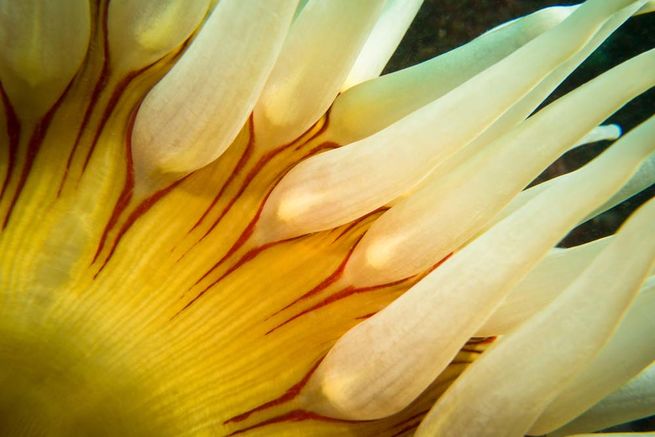
Get Close to your Subject. This is important in macro photography for two reasons. First, the subject will appear larger in the frame, presenting a crisper image with more detail. Second, the closer you are, the more effectively the flash/light will illuminate the subject. We want strong light in order to bring out rich color and contrast.
Take it to Their Level. A photo pointing down over the top of a subject surely documents the sighting, but it doesn’t make your viewer stop and say, “Wow!” Try to compose your photo with the camera on the same level as the subject, with their face clearly pointing towards the lens. You can even try getting slightly under the subject if they’re on a tall portion of the reef. That will allow you to capture some of the blue water background for color-contrast effect.
Eye Contact. Focus the photo on the subject’s eye (or rhinophores if a nudibranch). You can do this by placing the focus box over the eye, half-pressing the shutter to focus, and then recomposing and fully pressing the shutter. Sharp eye detail, especially when the subject is looking at the lens, will establish a connection with the viewer and a convey a sense of personality in the subject.
Try the DC2000’s Super Macro Focus Mode. This mode magnifies the subject by 1.7x, even when using a diopter, making the subject much larger in the frame. Note that this setting adjusts .jpg images only – raw shooters can skip this and crop in during post.