
The camera’s internal battery includes a includes a protective circuit that prevents the voltage from going below the minimum voltage threshold. New Micro 3.0 cameras are required to have a battery charge state not exceeding 30% in accordance with International Air Transport Association (IATA) regulations. If the camera does not power on because of a low battery state, follow these steps:
- Connect the camera to a standard USB wall charger. A USB wall charger with 5 volt / 2 amp output is recommended.
- If the camera powers on and displays a “PC – Charge – Ext Power” message, select “Charge”.
- If the camera does not power on, push and hold the shutter and power buttons simultaneously for 5 seconds. Then, power on the camera and select “Charge”.
- Allow the camera’s battery to fully charge, which can take a few hours.
When storing the camera for long periods, keep the battery power at 50% or higher.
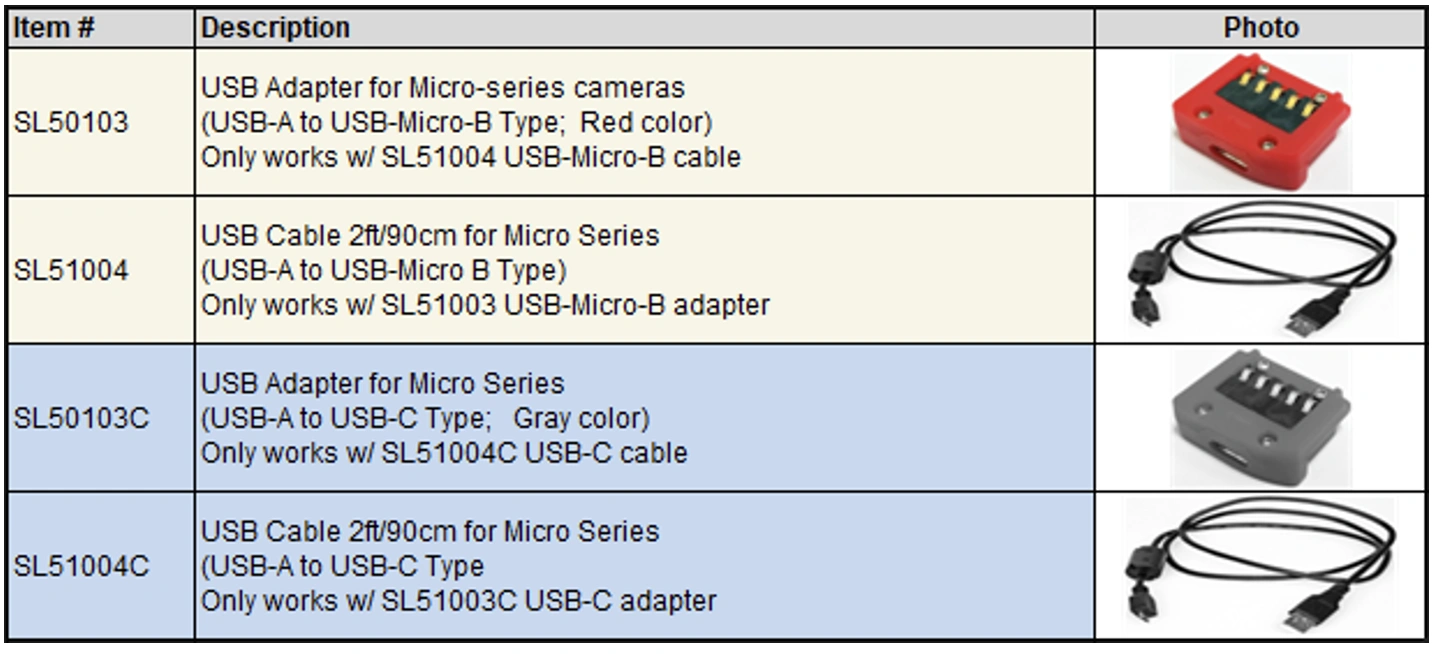
The original Micro 3.0 camera included a red type USB micro-B adapter and a USB-A to micro-B cable. In late 2025, SeaLife changed the USB adapter to comply with governmental regulations. The Micro 3.0 camera now includes a type USB-C adapter and a USB-A to USB-C cable.
Both the original red USB adapter and new gray USB adapter are compatible with any Micro 3.0 camera. However, the USB cable needs to match the adapter. Here are the item numbers, description, and photos of the original and newer USB adapters and cables:
The Micro 3.0 is permanently-sealed and depth tested to ensure the camera is waterproof. Here are two known causes for the camera to take on water:
a. Spray-on sunscreen damaging to reefs and plastics
It’s a known fact that many sunscreens contain chemicals harmful to reefs and marine life. These same chemicals are also damaging to some plastics, including polycarbonate commonly used to manufacture underwater camera housings and diving equipment. Test results confirm that spray-on sunscreens are particularly aggressive causing a chemical reaction that can make the material become brittle and crack.
SeaLife UW cameras/lights and some accessories are manufactured from a high-quality grade of polycarbonate. Polycarbonate is used in many products where high impact resistance and/or optical transparency is important. Such products include sports safety equipment, medical devices, automotive parts and electronic device housings, to name only a few. Despite polycarbonate’s impressive engineering characteristics and expansive presence in modern life, it is unfortunately susceptible to damage from some sunscreens.
We highly recommend using sunscreens that are advertised as safe for oceans and reefs. If you use a spray-on sunscreen, never apply it around your diving equipment or UW cameras/lights. Always wash your hands after applying sunscreen to avoid contaminating plastic material when handling it. Soak and rinse your cameras, lenses and lights for 20 minutes and allow to completely dry before storage.
b. Caution when connecting accessory to tripod mount
Do not connect any accessory to the camera’s ¼-20 tripod mount where the screw length exceeds 0.3” (7.5mm). Using a ¼-20 screw that is too long will bottom out in the tripod hole and create a high degree of stress to the camera housing material that may result in cracks and consequential flooding.
Also, never apply thread-locking compound or any chemicals to the tripod mount area. These compounds may cause chemical reaction that permanently damages the camera housing material and consequential flooding.
The camera should automatically power on when connected to a PC or wall charger, and display options for PC, CHARGE and EXT POWER. If the camera does not respond or continuously powers on and off, there may be a break in one of the USB connection points (i.e. USB pins, USB adapter, USB cable, PC USB port or Wall Charger). Follow these troubleshooting procedures.
- Thoroughly clean the gold-plated USB contacts on the camera and USB adapter using a cotton cloth moistened with isopropyl alcohol. Apply downward force when cleaning the contacts to remove films and debris stuck on the contact pins. If you see any sign of corrosion on the gold contacts of the camera, notify your local service center for repairs. If you see any sign of corrosion on the gold contacts of the USB adapter, replace the USB adapter. Note: The USB adapter is not waterproof and needs to be replaced if it gets wet.
- Only use the USB cable provided with your SeaLife Micro camera. Other USB cables may not be compatible because of insufficient conductivity or lack of proper shielding. Replace the USB cable if you see any signs of corrosion or damage.
- If the camera is not responding when connecting to a USB wall charger, try using a different wall charger to isolate the problem. We recommend a standard 5V, 2A USB wall charger commonly used to charge smartphones.
- If the camera is not responding when connecting to a computer USB port, try connecting to another USB port or a different computer to isolate the problem.
- If the camera display a “Low Battery” message when connecting to a computer or wall charger, see troubleshooting section 1 above.
If the above troubleshooting does not resolve the issue, please contact your authorized local SeaLife dealer or the service center in your country. For USA, please email service@sealife-cameras.com. For all other countries, please refer to the online dealer locator to find the service center near you.
Seeing this error message on the camera means there is a bad connection with the USB “data” contacts (i.e. USB pins, USB adapter, USB cable or PC USB port). The three inner gold-plated USB pins are for making a data connection to your PC. Follow these troubleshooting procedures.
- Thoroughly clean the gold-plated USB contacts on the camera and USB adapter using a cotton cloth moistened with isopropyl alcohol. Apply downward force when cleaning the contacts to remove films and debris stuck on the contact pins. If you see any sign of corrosion on the gold contacts of the camera, notify your local service center for repairs. If you see any sign of corrosion on the gold contacts of the USB adapter, replace the USB adapter. Note: The USB adapter is not waterproof and needs to be replaced if it gets wet.
- Only use the USB cable provided with your SeaLife Micro camera. Other USB cables may not be compatible because they are not designed for making a data connection. Replace the USB cable if you see any signs of corrosion or damage.
- Try connecting the USB cable to another USB port or different computer to isolate the problem.
If the above troubleshooting does not resolve the issue, please contact your authorized local SeaLife dealer or the service center in your country. For USA, please email service@sealife-cameras.com. For all other countries, please refer to the online dealer locator to find the service center near you.
The Micro 3+ app supports iPhones and Android phones running the latest version operating system. Please update your phone’s iOS or Android operating system. If you are still unable to make a wireless connection with Micro 3+ app, please try this:
- Check if you have the latest Micro 3+ app installed on your phone by going to Apple’s App Store or Google’s Play Store and searching “SeaLife Micro 3+”. If you see “Update”, please install the update. If you see “Open”, you have the latest app version installed.
- Turn off the phone’s Cellular service or turn ON the Airplane mode and then turn on WiFi. Cellular and Airplane mode settings are located at the top of the main settings menu. This is necessary because some phones will drop the WiFi connection in favor of a cellular connection with internet. Note: Your phone may show “No Internet connection” under the Micro 3+ WiFi connection, which is normal – the camera does not provide an internet connection.
- Make sure your phone has all Micro 3+ app permissions allowed. To find the Micro 3+ app permissions on an iPhone, go to Settings and scroll down to the SeaLife Micro 3+ app. On an Android phone, go to Settings, scroll down and select Apps, and scroll down to SeaLife Micro 3+ app. Here are screenshots showing how the app permissions should appear:
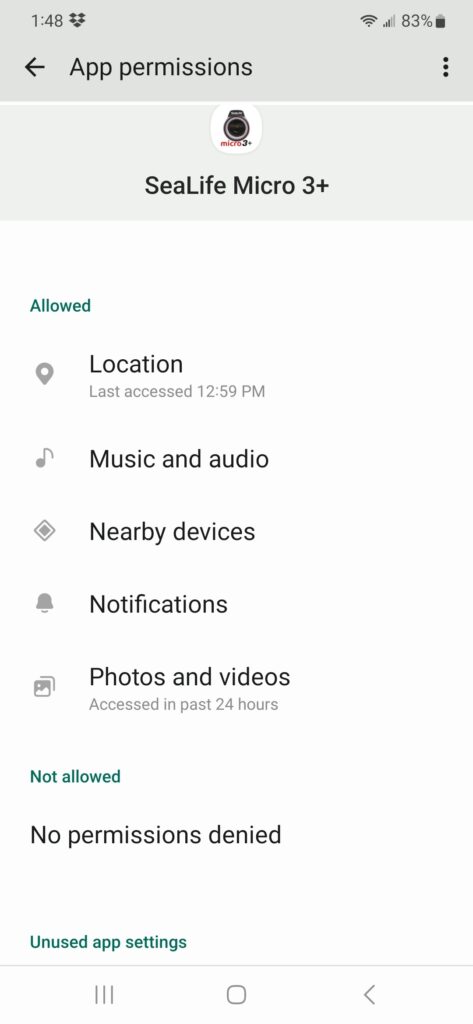

(Images Left to Right: Android App Permissions, iOs App Permissions)
- Check if your camera has the latest firmware version installed. To check what version is installed on your camera, power on the camera, push the Menu key, select “System Settings” and scroll down to “Firmware Version”. Click here for firmware update information: https://www.sealife-cameras.com/firmware/
- Disable any VPN app that may be running in the background. Search your phone settings for “VPN” and disable it.
- For iPhones and iPad’s, make sure Location Services is turned ON. Go to iPhone/iPad Settings >>> Privacy >>> Location Service (should be turned ON.)
- Here are two videos showing how to make a WiFi connection for iPhones/iPads and Android phones/tablets:
Please contact service@sealife-cameras.com if you experience any issues with the Micro 3+ app or firmware updates. Make sure to include the make/model of your phone and what operating system it is running.
The Micro 3+ app default password is 1 2 3 4 5 6 7 8 9 0. To reset the password, format the camera and then do a system reset. The format and system reset functions are located in the cameras System Settings menu. Important – make sure to download all photos/videos from the camera to your computer before doing this, as all files will be deleted.
SeaLife released Android app version V1.11 to the Google Play app store on September 11, 2024. The update corrects the video recording date/time data embedded in the video file.
To update the Micro 3+ app, go to the Google Play Store and search for SeaLife Micro 3+. Select “Update” and follow the on-screen instructions.
Please contact service@sealife-cameras.com if you experience any issues with the Micro 3+ app. Make sure to include the make/model of your phone and what operating system it is running.
SeaLife has released iOS app version V1.10 to the Apple App Store on September 11, 2024. The update fixes the following:
- Corrects the video recording date/time data embedded in the video file.
- Fixed bug associated with selecting “All Files” in the Camera gallery. Note: Wirelessly downloading multiple files from the camera is to the phone is limited to 1024MB per download session.
To update the Micro 3+ app, go to the Apple App Store and search for SeaLife Micro 3+. Select “Update” and follow the on-screen instructions.
Please contact service@sealife-cameras.com if you experience any issues with the Micro 3+ app. Make sure to include the make/model of your phone and what operating system it is running.
In Playback mode, single view or thumbnail view, you can delete the selected photo or video by pushing and holding shutter button. The camera will display “Delete this file” or “Delete all files”. Select the desired option using the up or down buttons. The camera will display “No” or “Yes”. Select Yes to delete or select No if you do not want to delete the file.
Note: You may also format the camera to delete all files.
We are not aware of any problems that would cause the camera to lock-up. In the unlikely event the camera locks-up, push and hold the shutter button and power key simultaneously for 5 seconds to force-off the camera. Please report any lock-ups to SeaLife service center at service@sealife-cameras.com. Include camera serial # and any details about when the lock-up occurred.
The camera includes a microphone located inside the permanently sealed housing. The mic setting may be turned off or to low, middle, or high. Even at the highest setting, the sound during video playback is very low, even when your computer’s speaker is set to high. Even though the mic is positioned against the inner wall of the housing, the camera’s waterproof design blocks most of the sound. We recommend using Windows Movie Maker, Apple iMovie, YouTube or video editing software to add music, underwater breathing sound and/or narrations to your final video production.
Note: Firmware update V1.07 does improve the video sound recording volume, but it is still lower volume than a normal land camera because the microphone is inside the waterproof enclosure.
The camera maintains 85% of its original power after 500 recharge cycles and 70% after 1000 recharge cycles. If the battery life becomes noticeably shorter, considering having it replaced by an authorized SeaLife service center for a cost of $147. The service includes a new Li-ion battery and waterproof depth testing to 200ft to ensure reliable waterproof seal. For more information, contact the USA SeaLife Service Center at service@sealife-cameras.com or contact the SeaLife distributor in your country by clicking here: https://www.sealife-cameras.com/dealer-locator/
Here is how to connect the Micro 3.0 camera to any smart phone/tablet using a USB cable and camera adapter. A wired connection results in much faster download speed compared to wireless connection.
Android
You will need a USB adapter that plugs into your phone or tablet’s USB port, converting it to a standard USB-A port. Most Android phones today have a USB-C type USB port. Here’s an example of a USB-C to USB-A adapter:

Insert the USB adapter into your phone or tablet and connect the SeaLife Micro camera USB cable into the adapter, just like you would with your computer. Power on the camera and select “PC”.
On your Android phone, open the “My Files” app and select USB Storage. There you will find a folder called DCIM containing all the photos and videos saved in the camera’s memory.
iPhone / iPad
You will need an Apple camera adapter. There are two adapters available depending the plug type of your iPhone/iPad. For iPhones/iPads using the original Lightning plug, use the “Apple Lightning to USB 3 Camera Adapter”. For newer iPhones/iPads using USB-C plug, use the “Apple USB-C Digital AV Multiport Adapter”. We recommend using the official Apple brand adapters. There are lower-priced brands available, but they may not work reliably. Adapters are available at most Apple Stores or online.

Apple USB-C Digital AV Multiport Adapter

Apple Lightning to USB 3 Camera Adapter
Here’s a diagram showing the connection configuration:

A = USB wall charger. For iPads, use a 5V 2A wall charger.
B = Apple USB cable (that you use for charging your iPhone/iPad)
C = Apple Camera Adapter
D = SeaLife USB cable (included with the Micro camera).
E = SeaLife USB adapter (included with the Micro camera).
Here is a video showing the connection procedure –
The SeaLife Micro HD+, 2.0 or 3.0 cameras only support wireless connection with Android or Apple smart phones / tablets, not with laptop or desktop computers.
The camera is designed to be operated at temperatures of 0°F to 120°F (-18°C to 50°C) on land and +33°F to +110°F(.5 °C to 44°C) underwater. When using the camera in extreme cold temperatures, the battery life at full charge will be less than when operating at normal room temperatures.
Accordion Content
Turning off the iPhone’s Bluetooth will greatly increase the WiFi download speed. The reason for this is that most recent iPhone models use one antenna for both WiFi and Bluetooth wireless transmission. Turning Bluetooth off allows the antenna to transmit at faster speeds.
When any iPhone is WiFi connected to the Micro 3.0 camera and the iPhone automatically locks, the WiFi connection will be dropped. To prevent this from happening, temporarily set your iPhone Auto-Lock setting to “Never”. Go to iPhone settings >>> Display & Brightness >>> Auto-Lock >>> Never
There are many factors that may contribute to pictures or videos not being sharp. Most common is shooting in low light conditions, which can cause a grainy image or motion blur. Consider purchasing a Sea Dragon external photo-video light ideal for capturing sharp, colorful pictures and videos underwater or in low light conditions.
The camera uses a fixed focus lens that is sharp from 15” (38cm) to infinity. Make sure to maintain at least 15” (38cm) distance between the camera and the subject. For closer shooting distances consider purchasing the SeaLife Super Macro Lens (SL571) or SeaLife 10X Close-Up lens (SL572) at your local SeaLife dealer. To find a dealer near you, click here: https://www.sealife-cameras.com/dealer-locator/
The Micro 3.0 camera includes three underwater color-correction filters, located in the white balance settings menu:
Underwater Deep – Ideal for shooting underwater at depths greater than 25ft/8m.
Underwater Shallow – Ideal for shooting underwater at depths less than 25ft/8m.
Underwater Green – Ideal for shooting underwater in green (algae) water.
Select the setting that best matches the depth and water conditions.
In some water conditions, the three preset color-correction filters are not a good match. In that case, use the manual white balance. That will produce the best color-correction match for your specific diving depth, location and conditions. Page 34 of the instruction manual includes details about using Manual white balance.
Here are a few things to know about underwater color-correction:
- The white balance color correction filters are most effective to depth within 50ft, depending on sunlight conditions and water visibility. At deeper depths or cloudy conditions, too much red and yellow colors are lost, so recovering the lost colors with a color filter is not very effective.
- For the best color and image quality, use an underwater photo-video light. The light restores all the lost colors and restores the natural vibrant colors of the coral and fish. For more information about underwater photo-video lights, click here – https://www.sealife-cameras.com/photo-video-lights/
Only JPG photo and MP4 movie files may be wirelessly downloaded from Micro 3 to SeaLife Micro 3+ app. However, you can make a wired connection directly to a smartphone/tablet and download JPG, MP4 and DNG files. For details on how to establish a wired connection between your Micro 3 and smartphone/tablet, please review to the above section 9.
Here is how to attach the included wrist strap to the camera:

1. Insert looped end of the strap through the strap connector hole.
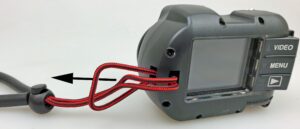
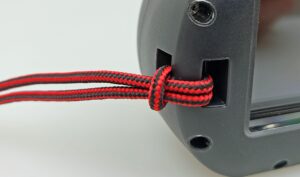
2. Feed strap through looped end and pull tight.