
Technical Updates for Sea Dragon Universal Flash
1. Flash is firing but pictures are dark
2. Flash not firing with DC2000 camera
3. Flash fires sometimes but not all the time with DC1400 camera
4. Compatible batteries for Sea Dragon Flash
5. Connecting Sea Dragon Flash to Olympus [mirrorless] camera housings
6. Flash-ready light keeps blinking
7. Flash fires when pushing test button but not with camera
8. Preventing over-exposed (washed out) when using AUTO brightness
1. Flash is firing but pictures are dark
The most common reason cause for this issue is the Sea Dragon flash is not synchronized with the camera. Here are simple steps to re-sync the Sea Dragon Flash:
- Power off the Sea Dragon flash.
- Push and HOLD test button, and power ON the flash.
- The flash-ready light should be blinking. Release the HOLD button.
- With your camera connected to the optical cable and flash, take a test picture. Important: Make sure your camera’s flash is set to FORCE ON so it always fires.
- The flash-ready light will stop blinking. The flash is now synchronized to your camera.
Note: If the flash-ready light does not stop blinking after step “e”, make sure the optical cable is properly connected to the camera and flash. Refer to the Sea Dragon Flash instruction manual for details about properly connecting the optical cable. The manual is also available online at https://www.sealife-cameras.com/manuals/
2. Flash not firing with DC2000 camera
Here are some common causes and solutions if the Sea Dragon flash is not firing or synchronized with the DC2000:
- The DC2000 will sync with the Sea Dragon Flash in any mode – UW Ext Flash, Program, Manual, Shutter Priority and Aperture Priority. The Sea Dragon Flash is factory programmed to fire with cameras that don’t use a pre-flash. The DC2000’s UW Ext Flash and Manual modes do not use pre-flash, but Program, Shutter Priority and Aperture Priority modes do use a pre-flash. You will need to re-sync the flash if switching between pre-flash and non-pre-flash modes. To resync the strobe, power off the flash >>> push and hold the test button and power on the flash [status light will blink] >>> take a test picture [status light is solid] >>> flash is now sync’d. You may also update the firmware to version V1.08, which has a pre-flash on/off setting. Turn pre-flash setting ON and all the modes will use pre-flash.
- Check optical cable connection. Make sure both ends of the cable have a clean cut – If not, cut with a razor blade. Inspect for bends, “kinks” in the cable – replace cable if there is a hard bend. Make sure there are no obstructions inside the cable hold under the flash that prevents the light from reaching the light sensor – clean as needed.
If this information does not fix the issue, please contact your local authorized SeaLife dealer or the distributor/service center in your country for further advice or possible repair service.
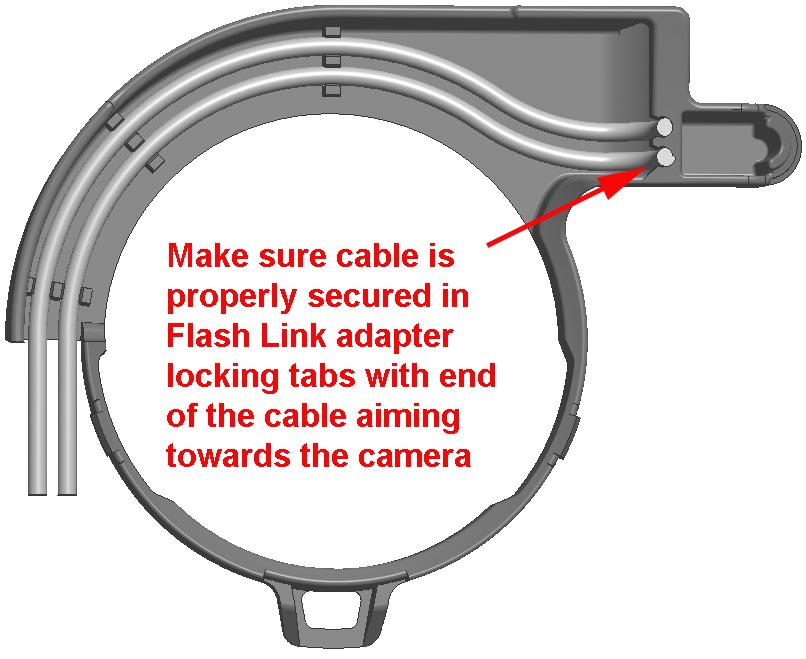
3. Flash fires sometimes but not all the time with DC1400 camera
If the Sea Dragon flash fires sometimes but not all the time, or fires on land and not underwater, check the following common causes:
Cable end must aim towards flash. Sometimes the cable is pulled back slightly and aiming towards the inner wall of the Flash Link adapter, which will cause firing issues.
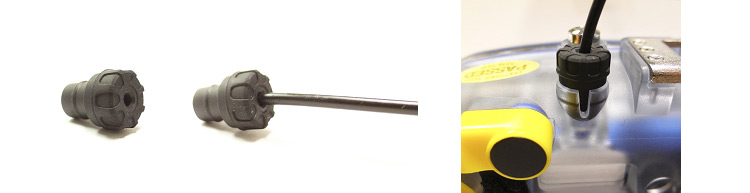
Connecting Flash to Olympus, Sea&Sea and other underwater housings using a 7mm optical flash port
Above left: Not completely sealed
Above right: Completely sealed
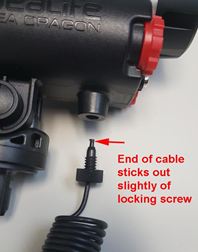
On the flash end of the cable, remove the locking screw and make sure there is no debris trapped inside the opening hole of the flash head. Clean out with a cotton swab if necessary. Then, insert the cable completely into the locking screw so a little bit sticks out the other end (See picture). Now, attach locking screw to flash head and tug on cable to make sure it’s secure.
4. Compatible AA batteries
The Sea Dragon Flash SL963 is compatible with single-use alkaline or rechargeable NiMH AA batteries only. We recommend Panasonic Eneloop AA NiMH rechargeable batteries. Do not use Nickle-Zinc (NiZn), 14500-type Li-ion rechargeable or single-use Lithium AA batteries as those batteries have different voltage outputs that may damage the electronic circuitry and/or cause battery to overheat..
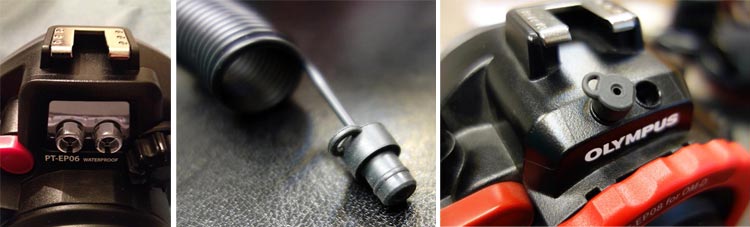
5. Connecting Flash to Olympus, Sea&Sea and other UW housings using 7mm optical flash port
All Sea Dragon Flashes will include an optical cable plug which is compatible with connecting the optical cable to Olympus, Sea&Sea and other underwater housings using a 7mm optical flash port.
If you purchased a Sea Dragon flash and did not receive the optical cable plug, please email proof of purchase to SeaLife or the distributor in your country to receive a free optical cable plug. The optical cable plug is also sold as a spare part: MSRP $5. Item SL96307.
Note: All the Olympus mirrorless camera housings include a rubber optical cable holder plugs. The plug can be used to block the inner camera’s flash or as an optical cable holder for connecting to the Sea Dragon flash.
6. Flash-ready light keeps blinking
It’s normal for the blue flash-ready light to blink for a few seconds after powering on the flash or taking a picture. A blinking light means the flash is charging. A steady light means the flash is ready to fire again. If the ready light is blinking for more than 10 seconds, replace or recharge the batteries. Make sure all 4 batteries are okay – the flash won’t charge if 1 of 4 batteries is bad. Never mix and match batteries.
If the ready light keeps blinking with new batteries, contact your local authorized SeaLife dealer or the distributor/service center in your country for further advice or possible repair service.
7. Flash fires when pushing test button but not with camera
The most common reason for the Sea Dragon Flash not firing is because the flash is not synchronized with the camera. Here are simple steps to re-synch the Sea Dragon Flash:
- Power off the Sea Dragon flash.
- Push and HOLD test button, and power ON the flash.
- The flash-ready light should be blinking. Release the HOLD button.
- With your camera connected to the optical cable and flash, take a test picture. Important: Make sure your camera’s flash is set to FORCE ON so it always fires.
- The flash-ready light will stop blinking. The flash is now synchronized to your camera.
Note: If the flash-ready light does not stop blinking after step “e”, make sure the optical cable is properly connected to the camera and flash. Refer to the Sea Dragon Flash instruction manual for details about properly connecting the optical cable. The manual is also available online at https://www.sealife-cameras.com/manuals/
8. Preventing over-exposed when using AUTO brightness
- If the Auto brightness setting consistently over-exposes the picture, the “average” brightness can be reduced. Do this:
i) Turn flash power on
ii) Set brightness dial to #1 (dot between 2 and “A”)
iii) Push and hold the TEST button down for 4 seconds.
iv) The flash-ready light will blink a few times indicating the new Auto bright setting is saved in memory.
Note: If pictures are consistently under-exposed (darker), repeat the above with the brightness dial set to #10. The Auto bright setting can be adjusted to any level between 1 and 10, with 10 being the highest average brightness. The factory setting is 5. - The SeaLife camera should be set to Ext Flash mode (See camera instruction manual for more details about Ext Flash Mode). When the camera is set to Ext Flash mode, you can push the Flash Button to switch between Macro Flash, Normal Flash and Far Flash. Setting it to “Macro Flash” will darken the image exposure.
- Make sure the white diffuser is installed. The diffuser reduces “hot-spots” and prevent over-exposed (washed-out) pictures.