1. SeaLife Micro Cam App Update V3.8

SeaLife has released SeaLife Micro Cam app update version V3.8 on August 30, 2023. The app update includes general updates for Android 13 compatibility.  The app update is available for free download on Google Play store.

If you encounter any app performance issues, please contact the USA SeaLife Service Center at service@sealife-cameras.com or contact the SeaLife distributor in your country by clicking here: http://www.sealife-cameras.com/authorized-dealer-locator

Back to Index


2. Unable to make wireless connection or download pictures/videos with SeaLife Micro Cam app

To correct wireless connectivity and downloading issues with the SeaLife Micro Cam app, please follow these steps:

  1. The SeaLife Micro HD+ was originally released with the Action Cam HD app. The Action Cam HD app has been replaced with newer SeaLife Micro Cam app, which is available at Apple’s App Store for iPhones and iPads, and Google Play Store for Android smart phones and tablets. When searching the Apple App Store for “SeaLife Micro Cam” using an iPad, make sure to select “iPhone Only” from the dropdown menu on the top left of your iPad. The SeaLife Micro Cam app was originally developed for the iPhone but works equally well with an iPad.
  2. Make sure your Micro HD+ is running on the latest firmware version V1.55. To download latest firmware, please visit the SeaLife website by clicking this link: https://www.sealife-cameras.com/firmware
  3. Check that the camera is running the latest SeaLife Micro Cam app version and update the app if a new version is available. To check if your app is using the latest version, go to Apple’s App Store for iPhones/iPads or Google Play Store for android smart phones and tablets. You will see “Update” if an update is available. You will see “Open” if the latest app version is already installed on your device.
  4. It is also recommended to update your smart phone or tablet to the latest operating system. Check your phone/tablet settings for available updates.
  5. Some Android smart phones and tablets will continue searching for another wireless connection after you established WiFi connection with the camera. The result is the wireless connection between your phone and camera will be dropped. The solution is to temporarily turn off your phone 3G/4G Data or put the phone in airplane mode and then turn on WiFi. Both of these methods result in your phone’s data turned off and WiFi turned on.
  6. If you have installed a VPN [virtual private network] app on your smart phone or tablet, disable the VPN before attempting to establish wireless connection with the Micro HD+ camera. The VPN app may interfere with the ability to wirelessly connect to the cameras.
  7. Uninstall and reinstall the app. Pictures previously downloaded to the app will not be deleted because those files are also saved to your phone/tablet photo gallery.

If you are still experiencing wireless connection issues, please contact the USA SeaLife Service Center at service@sealife-cameras.com or contact the SeaLife distributor in your country by clicking here: https://www.sealife-cameras.com/dealer-locator

Back to Index


3. SeaLife Micro Cam App – Unable to view downloaded pictures/videos

Make sure your iPhone/iPad settings allow the app to access photos. If this setting is not enabled, you will not be able to download pictures/videos from the Micro camera to your iPhone/iPad.

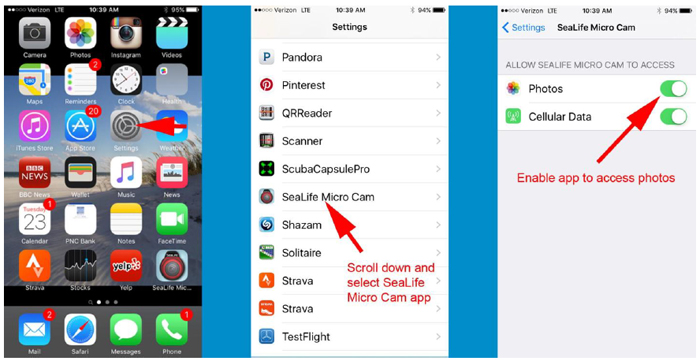
Important: If you already attempted to download pictures/videos before enabling the “access to photos” setting, you must delete and reinstall the app. After reinstalling the app, make sure “access to photos” setting is enabled as described above and try downloading files again.

Back to Index


4. Camera not powering on

When battery is empty, the camera may not have enough power to turn on and can lock-up and/or emit static sound from the speaker. Firmware update version V1.55 (for Micro HD+) fixes this issue. The firmware is available for free download on the SeaLife website: www.sealife-cameras.com/firmware

If you are not able to charge the battery or make USB connection with computer, please refer to section 5 below.

If the camera still does not power on, try this:
A. Push and hold the power and shutter buttons at the same time to force off the camera processor.

B. Connect camera to wall charger and charge for at least 20 minutes. If the camera does not respond to the wall charger, let it remain connected for 20 minutes.

C. Remove from wall charger and power on the camera.

If you are not able to get camera to power on, please contact the USA SeaLife Service Center at service@sealife-cameras.com or contact the SeaLife distributor in your country by clicking here: https://www.sealife-cameras.com/dealer-locator

Back to Index


5. Camera locks up

If camera locks-up, push the shutter and power button at the same time to force off the camera. Make sure your camera firmware is updated – See section 3 above. If you still experience camera lock after updating the firmware, please notify the SeaLife Service Center at service@sealife-cameras.com. Include camera serial # and any details about when the lock-up occurred.

Back to Index


6. Camera won’t connect to computer and/or won’t charge

If the camera does not respond when connecting to your computer or wall charger, do this in order:

A. Thoroughly clean the gold-plated USB contacts on the camera and USB adapter using a cotton swab or cloth moistened with isopropyl alcohol. Do not use pencil eraser or other abrasives to clean the contacts as that will remove some of the gold plating. If you see any sign of corrosion on the gold contacts of the camera, notify your local service center for repairs. If you see any sign of corrosion on the gold contacts of the USB adapter, replace the adapter (item # SL50103). Note: The USB adapter is not waterproof and needs to be replaced if it got wet.

B. Make sure to only use the USB cable provided with your SeaLife Micro camera. Other micro-B type USB cables may not be compatible because of insufficient conductivity or lack of proper shielding. Replace the USB cable (item # SL51004) if you see any signs of corrosion or damage.

C. Connect camera to the USB wall charger or computer. If the camera does not respond when making the connection, push the shutter and power button at the same time and keep it connected to wall charger (or computer) for at least 20 minutes. After 20 minutes, disconnect USB adapter and power on the camera. With camera powered on, reconnect camera to wall charger (or computer). The camera should respond to make connection and display PC – Charge – Ext Power options.

Important note: If the camera responds to computer connection [by displaying PC icon] but your computer does not show connection, it is most likely a failure with the 3rd and/or 4th USB contact pins, which is used for data connection. If thoroughly cleaning the USB contacts and replacing the USB adapter does not resolve the connection issue, please contact the SeaLife Service Center for repairs.

If you are unable to resolve USB connection issue, please contact the USA SeaLife Service Center at service@sealife-cameras.com or contact the SeaLife distributor in your country by clicking here: https://www.sealife-cameras.com/dealer-locator

Back to Index


7. WiFi range for Micro HD+

The Micro HD+’s maximum wifi range is about 200ft. The wifi signal range is less if there are obstructions, like walls and trees between the camera and smartphone or tablet. The wifi signal will not transmit underwater.

Back to Index


8. Low audio when playing back video

The camera includes a microphone located inside the waterproof enclosure, which may be turned ON or OFF. When the microphone is turned ON, the volume is preset to the highest possible setting, however the video recording audio is minimal because of the waterproof design. Underwater, you will hear the diver breathing. Above water only loud sounds will be recorded. We recommend using Windows Movie Maker, Apple iMovie, YouTube or video editing software to add music or narrations to your final video production.

Back to Index


9. Replacing internal battery

The camera maintains 85% of its original power after 500 recharge cycles and 70% after 1000 recharge cycles. If the battery life becomes noticeably shorter, considering having it replaced by an authorized Sealife service center for a cost of $147. Service includes new 3.7V 2350mAh Li-ion battery and waterproof depth testing to 200ft to ensure reliable waterproof seal. For more information, contact the USA SeaLife Service Center at service@sealife-cameras.com or contact the SeaLife distributor in your country by clicking here: https://www.sealife-cameras.com/dealer-locator

Back to Index


10. Connecting Micro HD+ to smartphone or tablet with USB cable

Here is how to connect the Micro HD+ camera to any smart phone/tablet using a USB cable and camera adapter. A wired connection results in much faster download speed compared to wireless connection.

Android
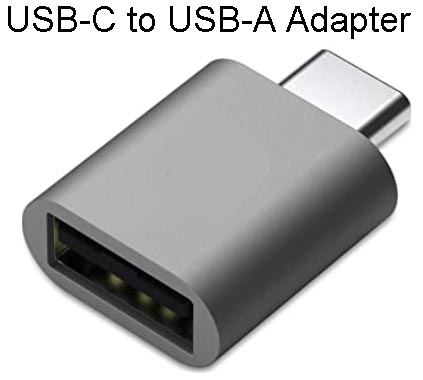
You will need a USB adapter that plugs into your phone or tablet’s USB port, converting it to a standard USB-A port. Most Android phones today have a USB-C type USB port. Here’s an example of a USB-C to USB-A adapter:

Insert the USB adapter into your phone or tablet and connect the SeaLife Micro camera USB cable into the adapter, just like you would with your computer. Power on the camera and select “PC”.

On your Android phone, open the “My Files” app and select USB Storage. There you will find a folder called DCIM containing all the photos and videos saved in the camera’s memory.

iPhone / iPad
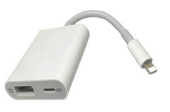
You will need an “Apple Lightning to USB 3 Camera Adapter”, which is available at most Apple Stores or online.

Here’s a diagram showing the connection configuration:

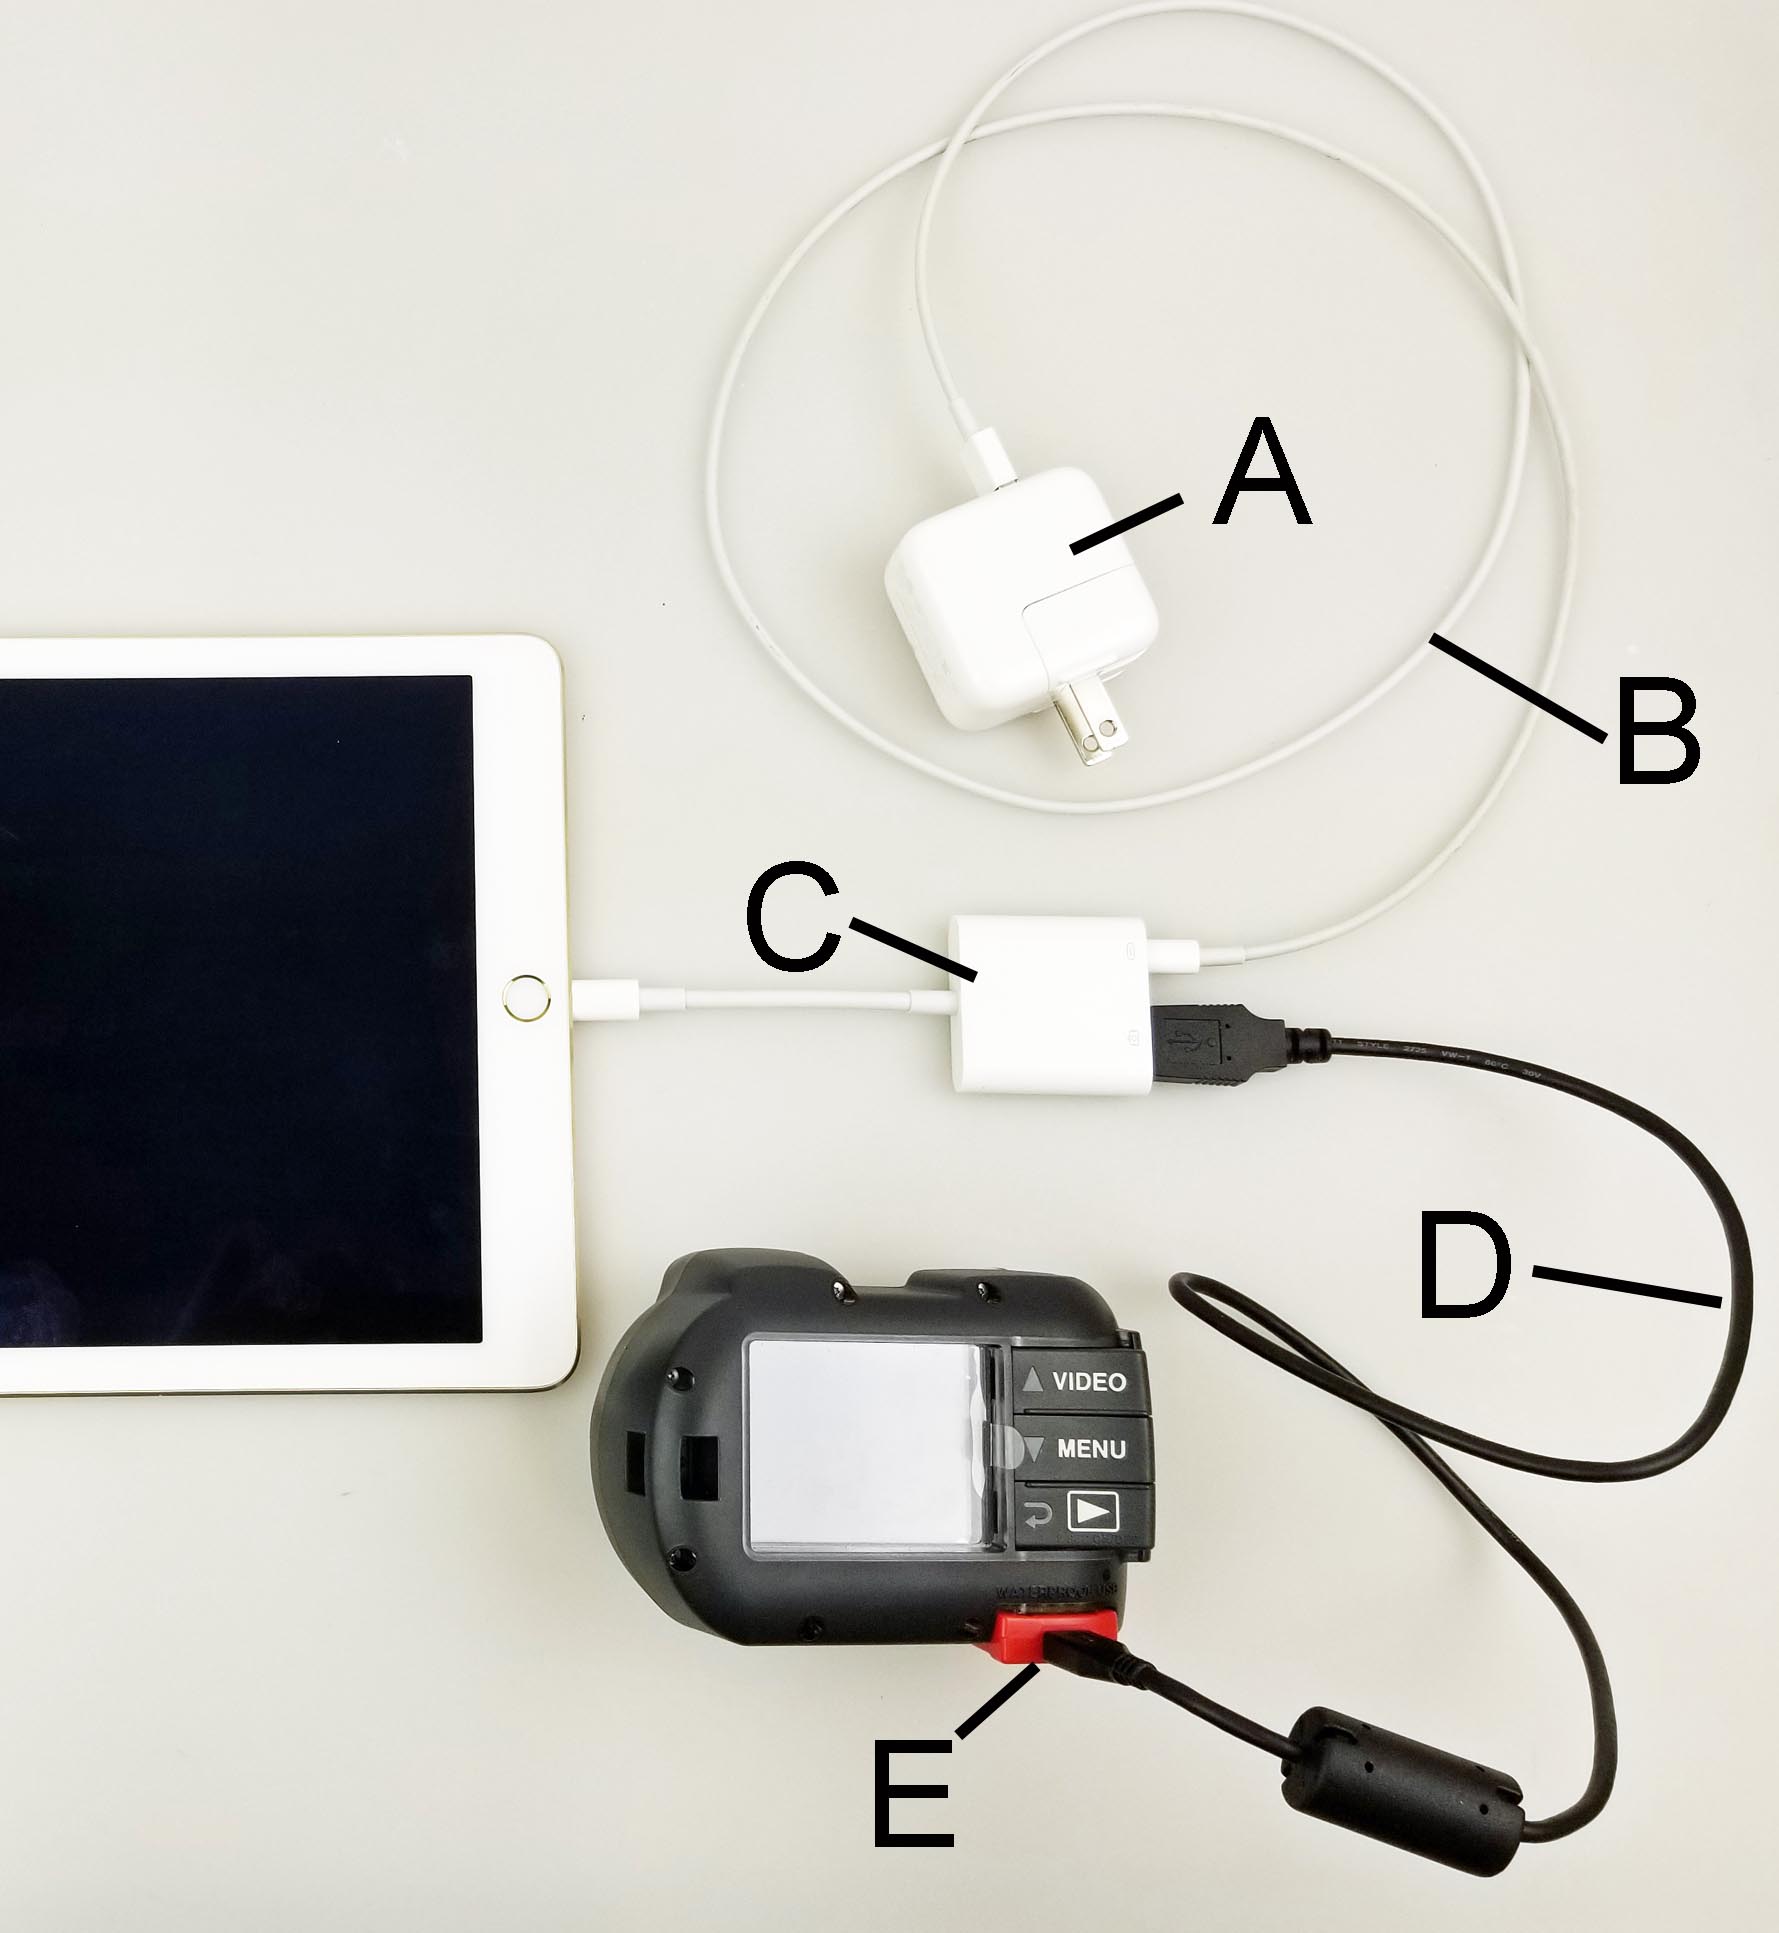
A = USB wall charger. Important: For iPads, you must use a larger 5V 2A wall charger. For iPhones, you can use a 5V 2A or 5V 1A wall charger.
B = Apple Lightning USB cable
C = Apple Lightning to USB 3 Camera Adapter
D = SeaLife USB cable included with the Micro camera.
E = SeaLife USB adapter included with the Micro camera.

Here is a video showing the connection procedure –

Back to Index


11. Can’t make WiFi connection to Amazon Kindle device

Even though the Kindle runs on an Android operating system, the SeaLife Micro Cam app or Action Cam HD app is not available in the Amazon app store and will not make wireless connection to the SeaLife Micro HD+ or Micro 2.0 cameras.

Back to Index


12. Can’t make WifI connection to laptop or desktop computer

The SeaLife Micro HD+ and 2.0 cameras only support wireless connection with Android or Apple smartphones/tablets, not with laptop or desktop computers.

Back to Index


13. Using a longer USB cable

The Micro HD comes with a 12”/30cm USB cable (item # SL50104). It’s a high quality cable with 80% copper shielded to prevent electromagnetic interference that can corrupt image files during download. A new longer cable with 80% copper shielding is now available for purchase from your SeaLife dealer or at www.sealifepartsdirect.com. The item # is SL51004 and suggested retail price is $6.

Back to Index


14. Battery life when using Micro HD / HD+ in extreme cold temperatures

The camera is designed to be operated at temperatures of 0°F to 120°F (-18°C to 50°C) on land and +33°F to +110°F(.5 °C to 44°C) underwater. When using the camera in extreme cold temperatures, the battery life at full charge will be less than when operating at normal room temperatures.

Back to Index


15. Recording continuous video

The camera is capable of recording continuous video as long as there is sufficient memory space and battery power available. The continuous video will be saved in 45 minute segments (about 3.8GB per segment).

Back to Index


16. Pictures / videos not sharp or out of focus

There are many factors that may contribute to pictures or videos not being sharp. Most common is shooting in low light conditions, which can cause a grainy image or motion blur. Consider purchasing a Sea Dragon external photo-video light ideal for capturing sharp, colorful pictures and videos underwater or in low light conditions.
The camera uses a fixed focus lens that is sharp from 12” (30cm) to infinity. Make sure to maintain at least 12” (30cm) distance between the camera and the subject. For close-up shooting distances of 6” to 24” consider purchasing the SeaLife 10X Close-Up lens at your local SeaLife dealer. To find a dealer near you, visit our Dealer Locator.

Back to Index


17. Underwater pictures / videos have too much red/purple

The SeaLife Micro HD+ features underwater white balance settings that corrects for the blue effect. Set the camera to Dive Mode for depths greater than 25ft/8m or Snorkel mode for shallower water. Dive mode uses “Underwater Deep” white balance which adds a more red and yellow to the image compared to Snorkel mode. These color correction modes work well, down to about 60ft/18m, where ambient light conditions are sufficient. At greater depths, there is a complete absence of reds and yellows, so color correction modes (or optical filters) are not very effective.

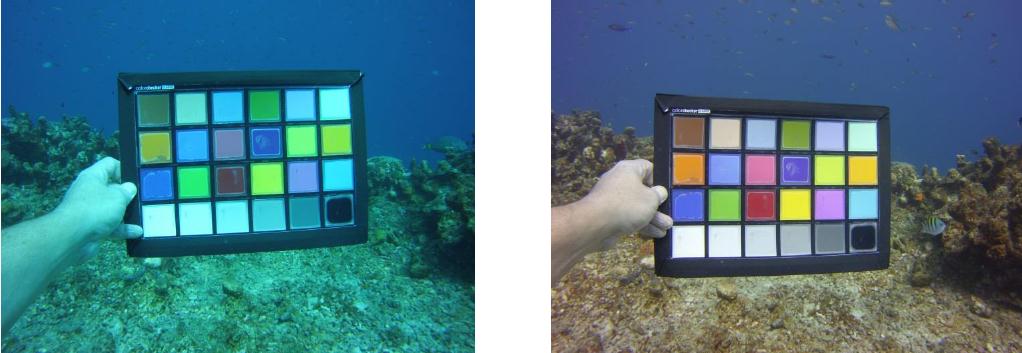
Above left: Picture taken at 30 ft in Land
Above right: Picture taken at 30 ft in Dive mode (w/ color correction)

In some diving conditions, the “Underwater Deep” white balance setting may result in over-correcting the image resulting in too much red/purple colors. In that case, select “Underwater Shallow” white balance.

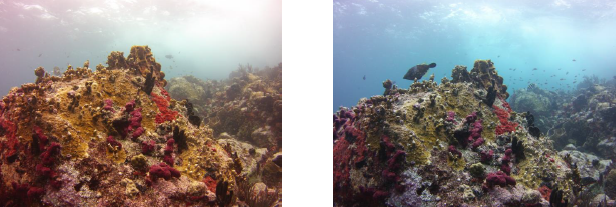
Above left: Camera set to “Underwater Deep” white balance results in too much red/purple
Above right: Same scene using “UW Shallow” white balance results in more natural colors

When using a photo-video light, set the camera to “Ext. Light” mode. If using two lights, select “Dual Ext. Lights” mode. These scene modes use “Underwater Shallow” as the default white balance setting, which adds a little color correction. In some darker shooting conditions, such as in shaded areas or night diving, the Underwater Shallow WB color correction causes too much red in the image foreground. In that situation, we recommend changing WB to “Auto”, which is a close match to the color temperature of the light and results in natural colors. Keep in mind that when shooting beyond the effective range of the light, we recommend turning the light off and changing WB to “Underwater Deep” or Underwater Shallow” depending on your depth.

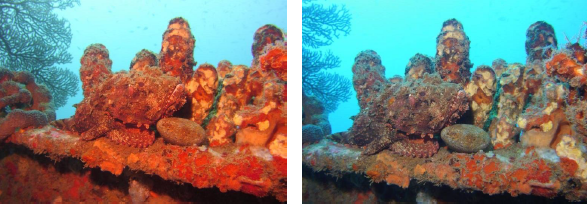
The above pictures of a scorpionfish were taken in a shaded area of a shipwreck. Camera was set to Camera + Ext Light mode, which uses Underwater Shallow as the default white balance setting. You can see the fish and foreground are a little too red. The picture to the right was the same scene but white balance was changed to “Auto” resulting in more natural colors.

Back to Index