1. DC1000 / DC800 / DC500 AC Power Supply (SL18132)
The AC Power Supply (SL18132) for the SeaLife DC1000, DC800 and DC500 cameras has been discontinued. There are many 3rd party manufacturers that sell a compatible power supply. Search for “AC Power Supply 5V 2A” Power supply specifications are:
Input: 1 00-240V AC; 50/60Hz; 0.5A
Output: 5V DC; 2A
Tip size: 4mm O.D. x 1.7mm I.D
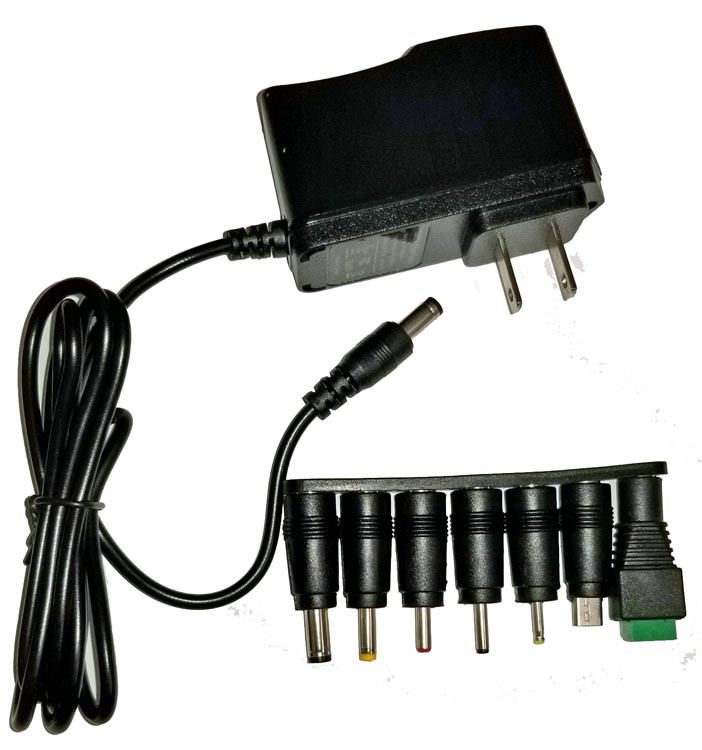
Above is example of AC Power Supply available online (From Amazon – Made by BOLWEO). Comes with multiple tips sizes including the required 4mm x 1.7mm tip.
Back to Index
2. DC800/DC1000 spare battery (SL1814)
The spare battery (SL1814) for the SeaLife DC800 and DC1000 cameras has been discontinued. Lenmar makes a compatible battery (item # DLRP8300) which is available online for about $15. Search “Lenmar DLRP8300.”
Back to Index
3. Switching between camera, video and playback modes when the camera is in its housing
When the camera is set to Sea, Ext Flash or Snorkel modes, you can select between Camera, Video and Playback modes by pushing the LCD display button. When the camera is in any other scene mode (and outside of the waterproof housing), use the slide switch on top of the inner camera to switch between video, playback and picture modes.
When using the camera on LAND inside the waterproof housing, set the camera to SEA mode and change the White Balance setting to Auto.
Back to Index
4. DC1000 buttons hard to push
The DC800 housing uses 7 rubber menu button covers and a SET rubber button cover (See picture below). The button covers are located inside the housing and make contact with the corresponding inner camera button.
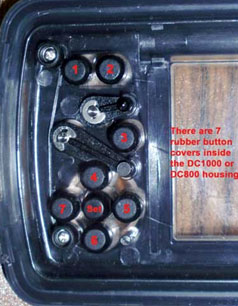
If you find that a housing button is not functioning or requires a great amount of force to active the camera, the rubber button cover may be missing or is damaged and needs to be replaced. In some cases, you may be able to resolve the issue by exchanging the affected rubber button cover with another button cover. Note: the SET button cover is different from the 7 MENU button covers and is not interchangeable.
You may order new rubber button covers (part # SL18026) from your local authorized SeaLife dealers or online at www.SealifePartsDirect.com (USA only).
If we can provide further assistance with this issue, please contact your local authorized SeaLife dealer or the distributor/service center in your country for repair service.
Back to Index
5. The DC1000 inner camera WILL NOT work inside the DC800 housing
While the DC1000 housing may appear similar to the DC800 housing, there are many differences. While you may be able to fit the DC1000 inside the DC800 housing (or visa-versa), it will result in flooding the housing and permanently damaging your inner camera.
Back to Index
6. Image vignette (black corners in picture) when using the SL970 Wide Angle Lens
The DC1000 is designed to work with the SeaLife SL970 Wide Angle Lens accessory and WILL NOT vignette underwater when set to Ext Flash, Sea or Snorkel mode. If you notice any vignetting in the picture, make sure the wide angle lens is completely pushed on to the lens port. Also make sure to “burp” out any air trapped between the Wide Angle Lens and camera housing lens port.
Back to Index
7. Using 16GB SDHC memory cards
For the DC1000 camera, SeaLife recommends using a SDHC memory card up to 8GB, which holds 2200 large size, fine quality pictures or at least 90 minutes of continuous video. You may encounter card error problems with SDHC cards larger than 8GB. You may also encounter memory card problems with read/write speeds of Class 10 or higher. SeaLife recommends using Class 4 or Class 6 memory cards. See “DC1000 Read/write speed specification” below for more details.
Back to Index
8. DC1000 Read / Write speed specification
The DC1000camera can transfer data to the SD or SDHC memory card at 1.5 MB (megabytes per second) or 12Mb/s (megabits per second). To optimize the cameras recycle time, we recommend using a memory card with minimum “Class 2” speed (rated at read/write speed of 2MB/s). “Class 4” or “Class 6” cards are also okay, but avoid using “Class 10” memory cards as the read/write speed may cause compatibility problems. Please contact the memory card manufacturer for specifications on the cards read / write speed.
Back to Index
9. Continuous shooting and zooming in Video mode
The video mode will shoot continuously until the memory card is full or the shutter button is pushed. You can zoom in or out before recording video, but once the video starts recording the zoom will be locked. Refer to page 31 of the DC1000 instruction manual for more information about video mode.
Back to Index
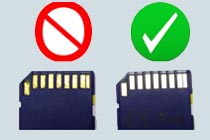
10. Compatible brands of SD memory cards
SeaLife no longer recommends using ONLY SanDisk, Panasonic, or Toshiba brand memory cards. Our testing over the last several years indicates that these brands are reliable cards, but many other brands have also proven to be just as reliable. We have not found any compatibility problems with brands like Delkin, Lexar, Kingston, PNY, Kodak, Polaroid, Kingmax, and Eye-Fi (wifi card). SeaLife cameras are designed to work with any brand of SD memory card.
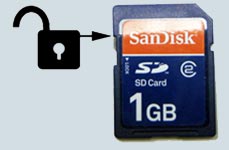
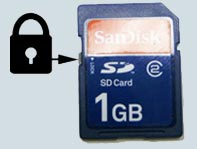
If you experience any performance problems with your SD memory card, it will most likely be a problem with the memory card. Check the following:
A. Make sure the is not locked
b) Make sure the contacts on the card are clean and the card is not damaged.
If the memory card is still not working with your SeaLife camera, return it to the dealer where its was purchased and exchange it with another brand or size.
Back to Index
11. Problems connecting the DC1000 inner camera to your computer
The DC1000 camera is compatible with Windows operating system versions 98, 2000, ME, XP, and later, and MAC operating systems version 9.0 and higher. The DC1000 camera will automatically connect to your computer when following the connection instructions outlined on page 67 of the DC1000 instruction manual. Here are some tips if you are still having problems connecting the camera to your computer.
- Make sure the camera battery is fully charged or connect the power cable to the camera.
- Reboot your computer and try again. Most connectivity problems are fixed when you restart your computer.
- For Windows operating system users, visit the Microsoft support site at http://support.microsoft.com/. Search on “Digital Camera” for a list of helpful tips from Microsoft.
- For Mac operating system users, visit the Apple support site at http://www.apple.com/support/. Search on “Digital Camera” for a list of helpful tips from Apple.
- Consider purchasing a SD memory card reader which connects to the USB port of your computer. You can quickly transfer pictures from your camera to your computer by removing the SC card from the camera and inserting it into your card reader.
Back to Index
12. Tips to prevent fogging [Inside the housing lens port]
Humid air or water drops trapped inside the housing may condense on the cooler glass lens port and cause fogging. Here is the best way to prevent fogging:
- Keep the inside of the housing perfectly dry. Even one water drop can evaporate inside the housing and condense (fog) on the lens port.
- Load the camera into the housing in a dry environment, like an air-conditioned room. This will help to avoid trapping humid air inside the housing.
- Apply a small amount of anti-fog solution to the inside surface of the housing lens port. Apply the anti-fog solution once a day in a dry room. Your local dive shop can recommend a good quality anti-fog solution.
- Use a fresh Moisture Muncher desiccant capsule (item # SL911) inside the housing.
Back to Index
13. Tips to prevent out-of-focus pictures
The camera’s auto focus system has an effective range is 3ft to infinity. Understanding how your camera’s auto focus system works will help you avoid taking out-of-focus pictures.
For the camera to focus correctly there must be sufficient ambient light to illuminate the subject. The camera may not “see” the subject in low light. The subject must also have some contrast. It is difficult for the camera to focus on a white wall with no contrast. The focus square in the center of the LCD display will turn green when the camera accurately determines the focus. If the focus square is red, the camera did not accurately determine the correct focus.
Here are some tips to ensure a sharp focus:
- Learn how to use the focus button (the button with the flower icon on it):
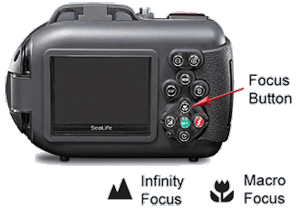
- The “normal focus” [no icon] shooting range is 1ft (30cm) to infinity. When using the zoom feature, normal focus is 1.5ft (45cm) to infinity.
- Push the focus [flower] button and select “Infinity focus” (mountain icon). This will lock the camera to infinity, so anything beyond 2ft (60cm) shooting distance is in focus. This setting is very helpful in low light conditions or when the subject is low in contrast. When the camera is set to Infinity focus, the camera will also have a very fast shutter response time.
- You can also set the camera to Landscape focus and benefit from a very fast shutter response time. Landscape focus will lock the camera to infinity, so anything beyond 2ft (60cm) shooting distance is in focus.
- The camera will set the focus on the subject located in the center of the picture. Align the square located in the center of the LCD over the subject. Subjects outside this square may not be in focus. The depth of field for close-up pictures is only a few inches.
- For more information about focusing, please refer to page 20 of the DC1000 instruction manual.
Back to Index
14. Dark area in picture when using camera’s internal flash
A dark area in the lower left corner of your image can occur when taking close-up pictures and the camera’s internal flash fires. The dark area or shadow is caused by the underwater housing lens extension which partially blocks the camera’s internal flash.
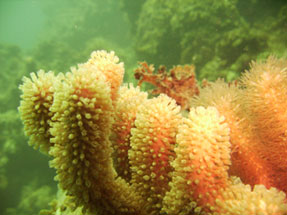
Notice the dark shadow area in the bottom left side of the picture. Turn the camera’s flash OFF or use the SeaLife external flash accessory (sold separately) to eliminate this problem.
There are a two ways to eliminate this shadow effect:
- Turn the camera’s internal flash OFF. There are a few factors to consider before you decide to turn on the camera’s flash. First, the DC1000 has a built-in color correction filter (in SEA mode) that only works when the flash is turned off. Turning on the flash cancels the color correction feature. The internal flash is not very powerful and only reaches about 2ft or 3ft depending on visibility. The camera’s internal flash causes backscatter (those small white dots in the picture) unless you are in perfectly clear water.
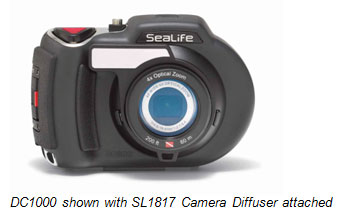
- Use the SeaLife Camera Diffuser (item # SL1817 – sold separately). The diffuser works with SeaLife camera models DC1000 and DC800. It is ideal for macro pictures and eliminates shadows, hot spots and results in great color and exposure balance.
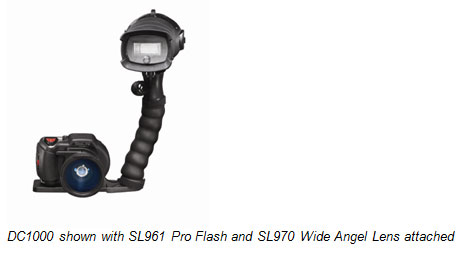
- Use the SeaLife Digital Pro Flash (flash accessory sold separately). The SeaLife Pro Flash accessory has a flexible arm that allows you to aim the flash head in virtually any direction. It will eliminate the shadow effect and also produce brighter, more colorful underwater pictures with less backscatter.
Back to Index
15. Stainless Steel
The DC1000 uses marine grade stainless steel hardware, which is ideal for use in saltwater and marine environment. If not cared for properly, rust stains may appear on surfaces. Make sure to rinse off the camera with fresh water after each use. Dry before storage. Make sure to completely remove the clear protective film that covers the metal face plate. Keep all metal surfaces clean. Avoid contact of the camera’s stainless steel parts with other inferior metals – This may contaminate the camera’s metal parts and cause rust staining. Rust stains should wipe off with soft plastic bristle brush or clean moist cloth. A good source for more information on stainless steel is http://www.ssina.com.
If the rust stain does not clean off, or if you see that rust stains have entered inside the shaft of the metal buttons [which usually will result in the button sticking], contact your local authorized SeaLife dealer or the distributor/service center in your country for repair service.
Back to Index
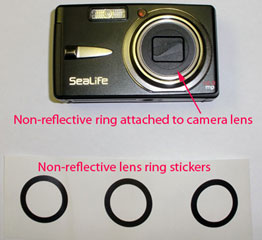
16. DC1000 lens reflection shows up in picture when using the SL970 wide angle lens
When using the SL970 wide angle lens with your DC1000 camera, it may be possible to see the inner camera lens ring reflection in the picture. The reflection is a rare condition that may occur under certain lighting conditions or camera shooting angles. For example, aiming the camera towards a very bright light source, like the sun or an over-flashed subject.
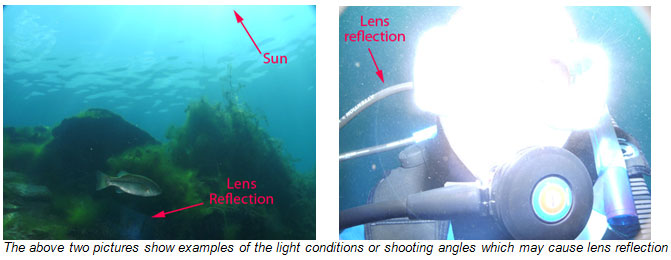
If you see lens reflection in your underwater pictures, SeaLife makes available (at no charge) a non-reflective sticker which attaches to the inner camera lens ring. Please contact the SeaLife Service Center in your country to obtain a free non-reflective ring sticker (item # SL18035).
Back to Index
17. DC1000 Firmware update – Video sound recording bug/h6>
With firmware version 1.25 (or earlier version), the camera’s video recording feature will not record sound unless the Color setting is set to Standard. When you change the Video Color setting to Vivid or any other color, the video will not record sound. This firmware bug has been fixed with firmware version 1.26, which is available for free download on the SeaLife website.
The new firmware release is located under the Technical Support menu on the SeaLife website. Please follow the download instructions.
Until you have a chance to update your camera’s firmware, please follow these steps to change the color setting back to Standard:
- Switch camera to Video Mode
- Push menu
- Scroll down to “Color”
- Push “Set button”
- Scroll up to “Standard”
- Push the “Set button”
- Push “Menu” to return to video screen.
Back to Index