1. O-ring falls out when opening housing
The DC1200 O-ring is made of a special low-durometer silicone material, which forms a very reliable wide seal when the housing is closed. The softer O-ring material may stick to the sealing surface of the closing door when opening the housing. Always make sure O-ring is clean, undamaged and correctly positioned in its groove prior to closing the housing. For detailed information about inspecting and caring for the DC1200 O-ring, please refer to page 60 to 63 of the DC1200 instruction manual.
Back to Index
2. Image vignette (black corners in picture) when using the SL970 Wide Angle Lens
The DC1200 is designed to work with the SeaLife SL970 Wide Angle Lens accessory and WILL NOT vignette underwater when set to Ext Flash, Sea or Snorkel mode. If you notice any vignetting in the picture, make sure the wide angle lens is completely pushed onto the lens port. Also make sure to “burp” out any air trapped between the Wide Angle Lens and camera housing lens port. If your SL970 wide angle lens does not make a tight, secure fit to your SeaLife camera, contact your local SL dealer or the SeaLife Service Center. In 2009, SeaLife has upgraded the snap on ring adapter of the wide angle lens for a more secure, tighter fit.
Back to Index
3. Using 16GB SDHC memory cards
For the DC1200 camera, SeaLife recommends using a SDHC memory card up to 8GB, which holds 1400 large size, fine quality pictures or at least 90 minutes of continuous video. We have tested 16GB SDHC memory cards from various popular brands without encountering any problems.
Back to Index
4. Continuous shooting and zooming in Video mode
The video mode will shoot continuously until the memory card is full or the shutter button is pushed. You can zoom in or out before recording video, but once the video starts recording the zoom cannot be adjusted unless you stop recording. Refer to page 32 of the DC1200 instruction manual for more information about video mode.
Back to Index
5. Camera powers OFF after powering ON or zoom automatically increases to 5X after power on
This problem is caused by not formatting the SD / SDHC memory card after it’s been used in another camera or electronic device. Make sure to format the memory card whenever it’s been used in another camera or electronic device.
- Remove the SD or SDHC card from the camera and upload your pictures and video to your computer. Use a USB card reader or the other camera / device that you shared the memory card with. Important: This must be done before formatting the SD or SDHC card. Failure to do this before formatting the card will result in loss of all pictures, videos and other files saved on the card.
- With the SD/SDHC card removed power the camera ON and push the MENU button.
- Follow the “Easy Set Up Menu” to select LAND (Auto Mode). There should be a red “A” in the top left-hand corner of the LCD display. This means you are in Auto mode (Land mode) this is the correct mode to be in for the repair.
- Power the camera OFF and insert the SD/SDHC card back into the camera.
- Power the camera ON and select menu/ setup/format (format will be on the second page) and follow the formatting instructions.
- Once the SD/SDHC card is formatted go back to the “Easy Set Up Mode” and set the camera to the desired setting (i.e. Land, Underwater, etc)
- Take about 5 pictures and then shut the camera OFF and power it back ON. The camera should now operate properly. Remember to designate 1 SD/SDHC card for your DC1200. Avoid switching cards between other cameras or devices. This could cause corruption.
Refer to page 20 of the DC1200 instruction manual for information on formatting the memory card.
Back to Index
6. Compatible brands of SD memory cards
SeaLife cameras are designed to work with any brand of SD memory card. SeaLife has performed extensive testing with various brands and size of SD / SDHC memory cards and we have not found any compatibility problems with brands like SanDisk, Panasonic, Toshiba, Delkin, Lexar, Kingston, PNY, Kodak, Polaroid, Kingmax and Eye-Fi (wifi card).
If you experience any performance problems with your SD memory card, it will most likely be a problem with the memory card. Check the following:
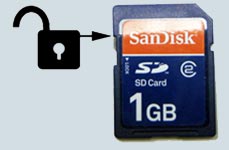
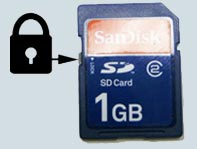
A. Make sure the card is not locked
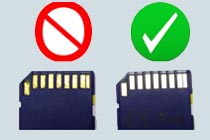
B. Make sure the contacts on the care are clean and the card is not damaged.
If the memory card is still not working with your SeaLife camera, return it to the dealer where its was purchased and exchange it with another brand or size.
Back to Index
7. Problems connecting the DC1200 inner camera to your computer
The DC1200 camera is compatible with Windows operating system version XP, Vista, 7.0 and higher, and MAC operating systems version 9.0 and higher. NO DRIVER IS NEEDED. The DC1200 camera will automatically connect to your computer when following the connection instructions outlined on page 54 of the instruction manual. Here are some tips if you are still having problems connecting the camera to your computer.
- Make sure the camera battery is fully charged or connect the power cable to the camera.
- Reboot your computer and try again. Most connectivity problems are fixed when you restart your computer.
- For Windows operating system users, visit the Microsoft support site at http://support.microsoft.com/. Search on “Digital Camera” for a list of helpful tips from Microsoft.
- For Mac operating system users, visit the Apple support site at http://www.apple.com/support/. Search on “Digital Camera” for a list of helpful tips from Apple.
- Consider purchasing a SD memory card reader which connects to the USB port of your computer. You can quickly transfer pictures from your camera to your computer by removing the SC card from the camera and inserting it into your card reader.
Back to Index
8. Tips to prevent fogging [Inside the housing lens port]
Humid air or water drops trapped inside the housing may condense on the cooler glass lens port and cause fogging. Here is the best way to prevent fogging:
- Keep the inside of the housing perfectly dry. Even one water drop can evaporate inside the housing and condense (fog) on the lens port.
- Load the camera into the housing in a dry environment, like an air-conditioned room. This will help to avoid trapping humid air inside the housing.
- Avoid letting the camera get hot or sit in direct sunlight.
- Avoid opening the housing in a humid environment
- Apply a small amount of anti-fog solution to the inside surface of the housing lens port. Apply the anti-fog solution once a day in a dry room. Your local dive shop can recommend a good quality anti-fog solution.
- Use a fresh Moisture Muncher desiccant capsule (item # SL911) inside the housing.
If you followed the above advice and the camera still fogs, contact your local authorized SeaLife dealer or the distributor/service center in your country for repair service.
Back to Index
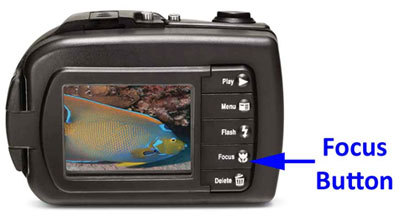
9. Pictures are out of focus or camera not focusing
The DC1200 auto focus system has an effective range of 4″ (10cm) to infinity. Here is some important information on how to avoid taking out-of-focus pictures:
1. Focus settings
NORMAL – When you first turn on the camera it will be in “normal focus” [no icon] and the shooting range is 2ft (60cm) to infinity.
MACRO – Pushing the focus button once will change the focus setting from Normal focus to Macro focus. A flower icon appears on the top left of the LCD display. Macro focus is used for taking close-up pictures at a shooting distance of 4″ (10cm) to 3ft (90cm). Important: When you increase the optical zoom to maximum, the minimum shooting distance increases to about 20” (50cm) to infinity.
INFINITY – Push the focus button again to select “Infinity focus”. An infinity icon will appear on the top left of the LCD display. This will lock the camera to infinity, so anything beyond 3ft (90cm) shooting distance is in focus. This setting is very helpful in low light conditions or when the subject is low in contrast. When the camera is set to Infinity focus, the camera will also have the fastest shutter response time. Important: When using the SeaLife Wide Angle Lens (SL970), keep the focus setting on Normal or Macro, not infinity. The camera needs to focus through the wide angle lens to produce a sharp picture.
Use a fresh Moisture Muncher desiccant capsule (item # SL911) inside the housing.
2. The camera will focus on the subject located in the center of the picture. Align the square located in the center of the LCD over the subject. Subjects outside this square may not be in focus.
3. When taking a picture or shooting video, push and hold the shutter button half way to focus the camera. The focus frame in the center of the LCD display will turn green when the camera accurately determines the focus. If the focus square is red, the camera did not accurately determine the correct focus. If the focus frame is red, make sure the focus setting is correct and that there is sufficient lighting and try again.
A green focus frame indicates the auto focus is good.
A red frame indicates the camera is not focused on the subject.
4. In order for the camera to automatically focus on the subject there must be sufficient ambient light to illuminate the subject. The camera may not “see” the subject in low light. The subject must also have some contrast. For example, it is difficult for the camera to focus on a white wall with no contrast.
5. QUICK SHOT MODE: When Quick Shot is set to ON, the camera takes a picture without using the auto focus. This will speed up the camera’s response time (i.e. shutter lag). The focus will be locked to the shooting distance of the LAST picture taken before turning Quick Shot On. For example, with Quick Shot turned OFF, set the focus to Macro and take a picture of something at 6″ shooting distance. Now set the Quick Shot to ON and the camera focus will remain locked a shooting distance of 6″. When Quick Shot is ON, the focus frame on the camera’s LCD display will remain gray and not turn red or green. When powering off the camera, the Quick Shot focus distance is not saved and will be set to infinity focus. This mode is useful when taking a series of pictures at the same shooting distance and shutter response time is an important factor. Important: Remember to turn Quick Shot OFF if you want to use the camera’s auto focus
6. For more information about focusing, please refer to page 22 of the DC1200 instruction manual.
Back to Index
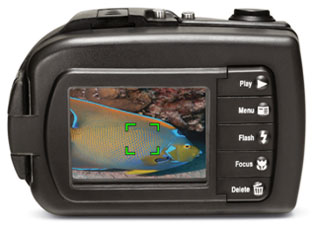
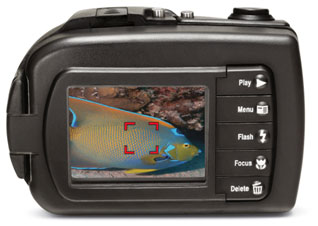
10. Dark area in picture when using camera’s internal flash
A dark area in the lower left corner of your image can occur when taking close-up pictures and the camera’s internal flash fires. The dark area or shadow is caused by the underwater housing lens extension which partially blocks the camera’s internal flash.
Notice the dark shadow area in the bottom left side of the picture. Turn the camera’s flash OFF or use the SeaLife external flash accessory (sold separately) to eliminate this problem.
There are a two ways to eliminate this shadow effect:
- Turn the camera’s internal flash OFF.
There are a few factors to consider before you decide to turn on the camera’s flash. First, the DC1200 has a built-in color correction filter (in Sea and Snorkel modes) will only work when the flash is turned off. Turning on the flash cancels the color correction feature. The internal flash is not very powerful and only reaches about 2ft depending on visibility. The camera’s internal flash will probably result in backscatter (those small white dots in the picture) unless you are in perfectly clear water.
- Use the SeaLife Digital Pro Flash (flash accessory sold separately).
The SeaLife Pro Flash accessory has a flexible arm that allows you to aim the flash head in virtually any direction. It will eliminate the shadow effect and also produce brighter, more colorful underwater pictures with less backscatter.
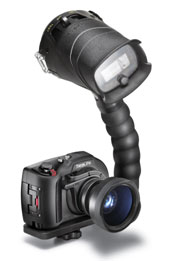
DC1200 shown with SL961 Pro Flash and SL970 Wide Angel Lens attached
Back to Index
11. Tips for avoiding rust stains on stainless steel parts
The DC1200 uses marine grade stainless steel hardware, which is ideal for use in saltwater and marine environment. If not cared for properly, rust stains may appear on surfaces. Make sure to rinse off the underwater housing with fresh water after each use. It is best to soak the housing in fresh water for at least 5 minutes. Push each of the buttons and turn the zoom lever several times while the housing is soaking to remove any salt deposits under the buttons and zoom knob. Allow the housing to dry before storage. Keep all metal surfaces clean. If rust stains appear, use a soft bristle brush (like toothbrush) or clean moist cloth. A good source for more information on stainless steel is http://www.ssina.com.
If the rust stain does not clean off, or if you see that rust stains have entered inside the shaft of the metal buttons [which usually will result in the button sticking], contact your local authorized SeaLife dealer or the distributor/service center in your country for repair service.
Back to Index
12. DC1200 Read / Write speed specification
The DC1200 camera can transfer data to the SD or SDHC memory card at 1.5 MB (megabytes per second) or 12Mb/s (megabits per second). To optimize the cameras recycle time, we recommend using a memory card with minimum “Class 2” speed (rated at read/write speed of 2MB/s). “Class 4” or “Class 6” cards are also okay, but avoid using “Class 10” memory cards as the read/write speed may cause compatibility problems. Please contact the memory card manufacturer for specifications on the cards read / write speed.
Back to Index